
Mother’s Day is a great opportunity to show appreciation for the special moms in your life, and crafting something sweet is one of the easiest ways to do it! Whether you’re a seasoned DIYer or just trying your hand at arts and crafts, these simple ideas offer a fun way to express your love. Grab some basic supplies, set aside a little time, and consider personalizing each craft with a note or a special touch to make it even more meaningful.
Personalized Mother’s Day Cards

Creating personalized Mother’s Day cards is a heartfelt way to express your love and appreciation. These cards can be simple yet meaningful, offering a touch of creativity and warmth. Using unique designs and heartfelt messages, you can make each card special, perfect for any mother figure in your life.
To make the process even more enjoyable, gather some colorful craft supplies like markers, stickers, and decorative paper. Let your imagination run wild as you create something truly unique. Here’s a quick recipe for a beautiful card that will surely put a smile on her face!
What You’ll Need
- Blank cardstock or thick paper
- Colored markers or crayons
- Stickers (flowers, hearts, etc.)
- Glue
- Decorative paper or washi tape
Instructions
- Start with a piece of cardstock folded in half to create the card base.
- Use colored markers to write a heartfelt message on the front, such as “To the Best Mom” or “You Mean the World to Me.”
- Add stickers or drawings around your message to enhance the design.
- Cut decorative paper or washi tape into fun shapes and glue them on the card for an added touch.
- On the inside, write a personal message that shares a favorite memory or expresses your gratitude. You can also include a little drawing or a fun doodle!
Plan your design ahead of time and using a variety of colors to make your card pop. Don’t hesitate to add personal touches that reflect your relationship with your mom!
Custom Tote Bags with Fabric Paint
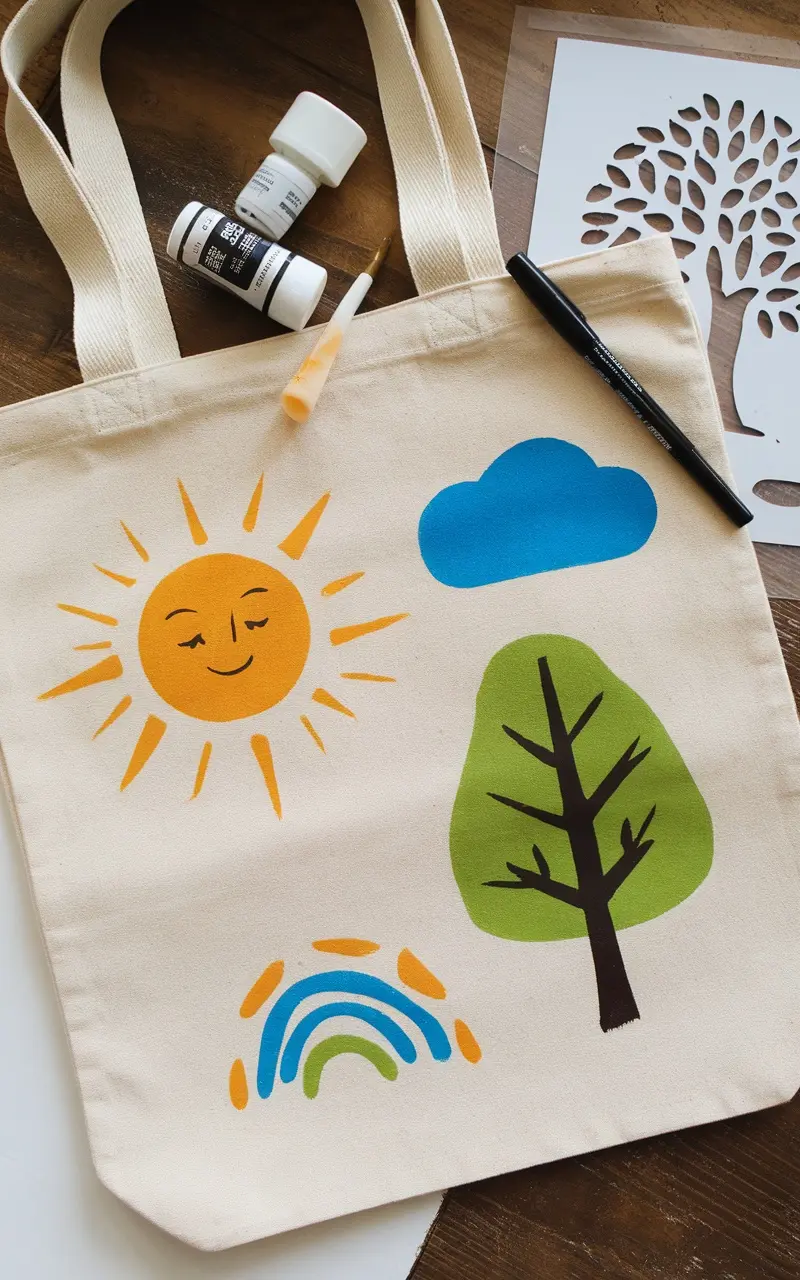
Creating custom tote bags with fabric paint is a fun and simple project that not only allows for self-expression but also makes for a thoughtful gift. Whether you’re making it for a special occasion like Mother’s Day or just for fun, these personalized bags are practical and stylish. The process is straightforward, making it suitable for all ages, so gather your loved ones and enjoy some creative time together!
To get started, you’ll need a plain canvas tote bag, fabric paints in various colors, and some brushes or sponges. Don’t worry about being a professional artist; this project is all about having fun and showcasing your unique style. Here are some tips for implementing your ideas: plan your design in advance, use stencils for detailed patterns, and don’t forget to let each layer dry before adding more. This way, your artwork will look fresh and vibrant for a long time!
What You’ll Need
- 1 plain canvas tote bag
- Fabric paints (variety of colors)
- Brushes or sponges
- Stencils (optional)
- Cardboard (to insert into the bag while painting)
Instructions
- Prepare Your Workspace: Lay down some old newspapers or a plastic tablecloth to protect your surface. Insert a piece of cardboard into the tote bag to prevent paint from bleeding through.
- Design Your Tote: Sketch your design lightly on the bag with a pencil or use stencils to create shapes. This step will help guide your painting.
- Start Painting: Use your brushes or sponges to fill in your design with fabric paint. Don’t be afraid to mix colors or try out different techniques!
- Let It Dry: Once you finish painting, allow the bag to dry completely. This may take a few hours, depending on the thickness of the paint.
- Set the Paint: If necessary, follow the instructions on your fabric paint to heat set it, ensuring your design lasts through washes.
Handmade Soap with Natural Ingredients
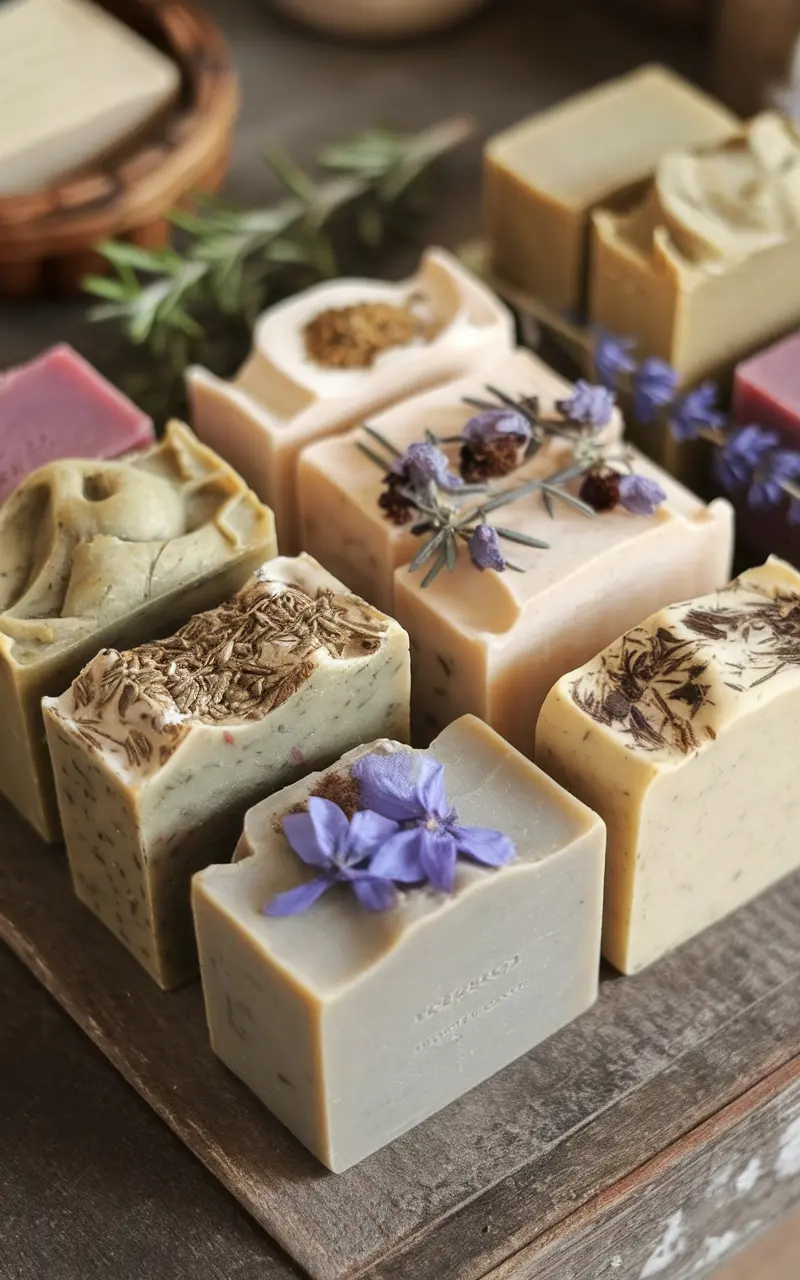
Making handmade soap is a delightful way to show love and care, especially for Mother’s Day. This simple recipe allows you to create beautiful bars enriched with natural ingredients like essential oils and herbs, giving them a fresh, aromatic touch. Not only do they smell lovely, but they also offer skin-nourishing benefits without harsh chemicals.
This process is straightforward and can be done even by beginners. It’s a fun craft that lets you customize scents and colors, making it a personal gift that your loved ones will appreciate. Plus, the satisfaction of using something you made yourself is truly rewarding!
What You’ll Need
- 1 pound of melt-and-pour soap base
- 1 tablespoon of essential oils (like lavender or eucalyptus)
- Dried flowers or herbs (such as lavender, rosemary, or chamomile)
- Soap colorants (optional)
- Silicone molds
Instructions
- Prep the Soap Base: Cut the melt-and-pour soap base into small cubes for easier melting.
- Heat the Soap: In a microwave-safe bowl, heat the soap cubes in 30-second intervals until fully melted, stirring in between.
- Add Fragrance and Color: Once melted, mix in your essential oils and colorants, stirring until well blended.
- Incorporate Dried Ingredients: Add in any dried flowers or herbs, mixing them gently into the soap mixture.
- Pour into Molds: Carefully pour the mixture into silicone molds and tap gently to remove any air bubbles.
- Let it Set: Allow the soap to cool and harden completely, which typically takes a few hours.
- Remove from Molds: Once set, carefully remove the soap bars from the molds. Your handmade soap is now ready to be wrapped up as a lovely gift!
Experiment with different essential oils for unique scents, and using seasonal herbs for a touch of nature. You can also add a personal touch by including a heartfelt note or a simple label on your soap packaging.
Memory Jar Filled with Love Notes
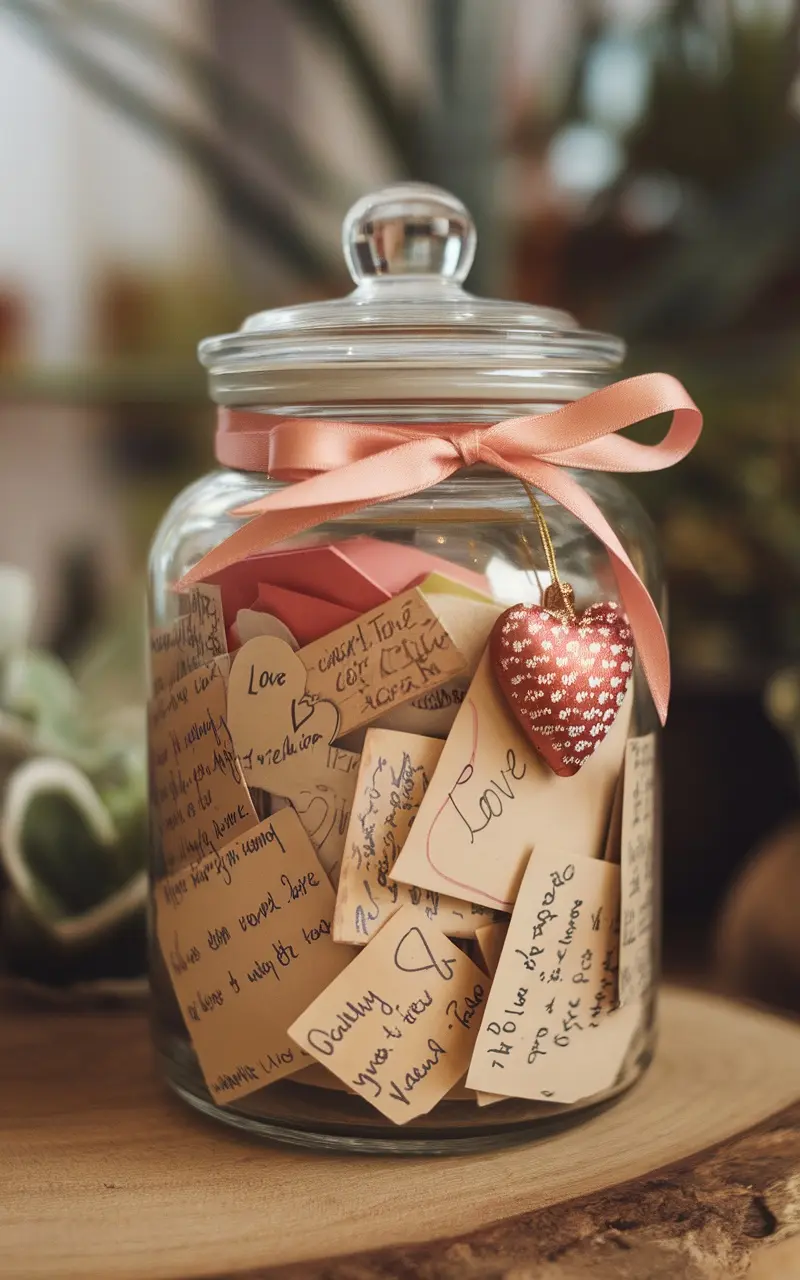
Creating a Memory Jar filled with love notes is a heartfelt way to celebrate Mother’s Day. This simple project allows you to gather cherished memories, uplifting messages, and heartfelt sentiments all in one place. It’s not just a craft; it’s a beautiful expression of love that can be revisited time and again.
The process is easy and quick, making it perfect for all ages. You can personalize it to fit your mom’s favorite colors or themes, adding a special touch to your gift. Gather your supplies and let your creativity flow as you fill the jar with notes that reflect your love and appreciation.
What You’ll Need
- A glass jar with a lid
- Colorful paper or sticky notes
- Markers or pens
- Ribbon for decorating
- Optional: Small decorations like stickers or charms
Instructions
- Prepare the Notes: Cut the colorful paper into small squares or hearts. Each piece should be big enough to write a short message or memory.
- Write Your Messages: Take some time to think about your favorite memories or things you appreciate about your mom. Write these down on the pieces of paper.
- Fill the Jar: Once you have a good number of notes, fold them and place them in the glass jar. You can arrange them carefully or mix them up for a surprise element.
- Decorate the Jar: Tie a ribbon around the jar’s neck and add any additional decorations that reflect your mom’s style.
- Present Your Gift: Give the jar to your mom with a loving note explaining what it is. You can encourage her to read one note each day for a month or whenever she needs a pick-me-up.
Make this project a family affair by involving siblings or kids. You can also encourage each family member to contribute a few notes. This will create a richer collection of memories and sentiments!
Hand-Painted Flower Pots
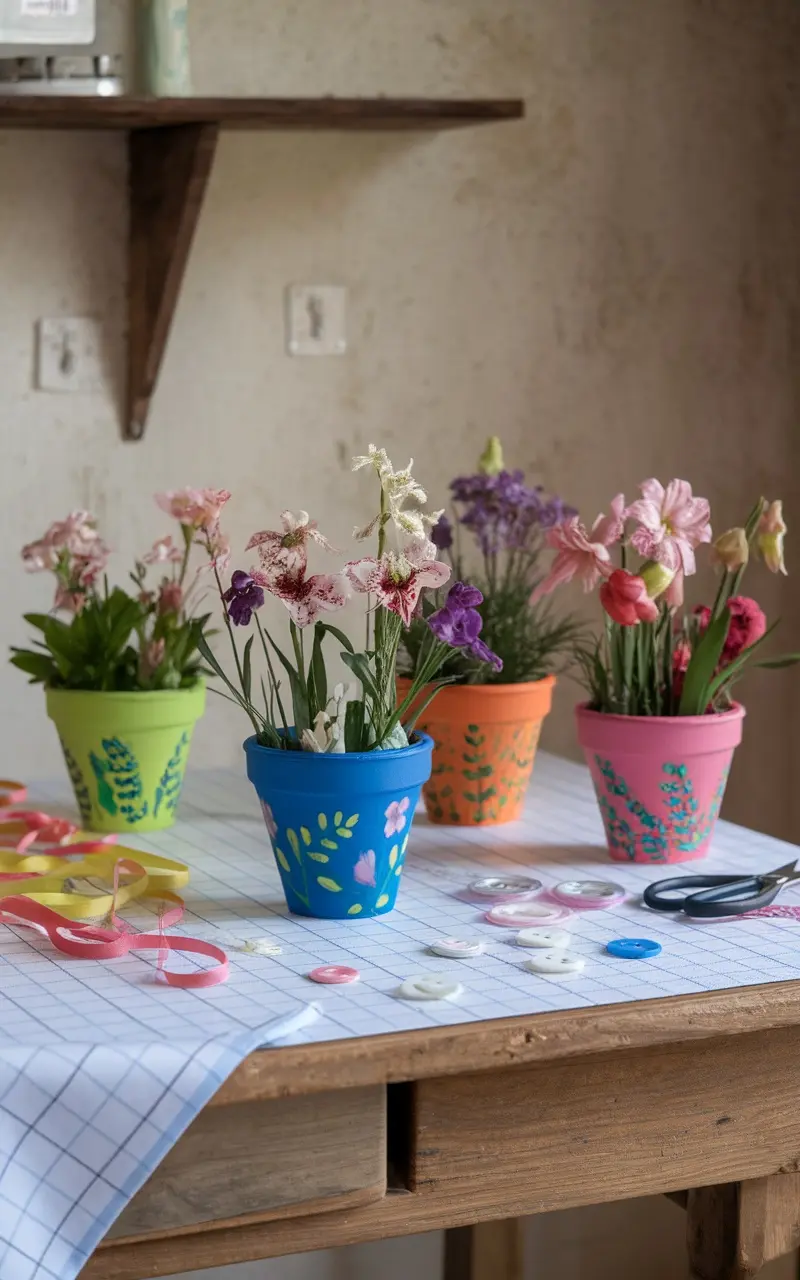
Hand-painted flower pots are a charming way to celebrate Mother’s Day. They allow for creativity while providing a lovely home for beautiful plants. The process is simple and can be enjoyed by anyone, regardless of artistic ability. Plus, these personalized pots make for thoughtful gifts that can brighten up any space.
To create your own hand-painted flower pots, start with terracotta pots and your choice of acrylic paints. You can use stencils or freehand designs to add a personal touch. Once painted, fill them with flowers or herbs, and you’ll have a delightful gift that your loved ones will appreciate.
What You’ll Need
- Terracotta flower pots
- Acrylic paint (various colors)
- Paintbrushes (various sizes)
- Sealant spray (for durability)
- Soil
- Flowers or herbs of your choice
Instructions
- Prepare your workspace by laying down newspaper or a tablecloth to catch any spills.
- Clean the terracotta pots and let them dry completely.
- Start painting your designs on the pots. You can use a combination of different colors and patterns. Let each layer dry before adding more details.
- Once the paint is completely dry, spray a coat of sealant to protect your artwork.
- Fill the pots with soil and plant your flowers or herbs. Water them gently.
- Present your hand-painted flower pots as gifts, showcasing your artistic touch and thoughtfulness.
To make the painting process easier, consider using painter’s tape to create clean lines or sections on your pots. Get creative with your designs and have fun with different color combinations!
Decorative Mason Jar Vases
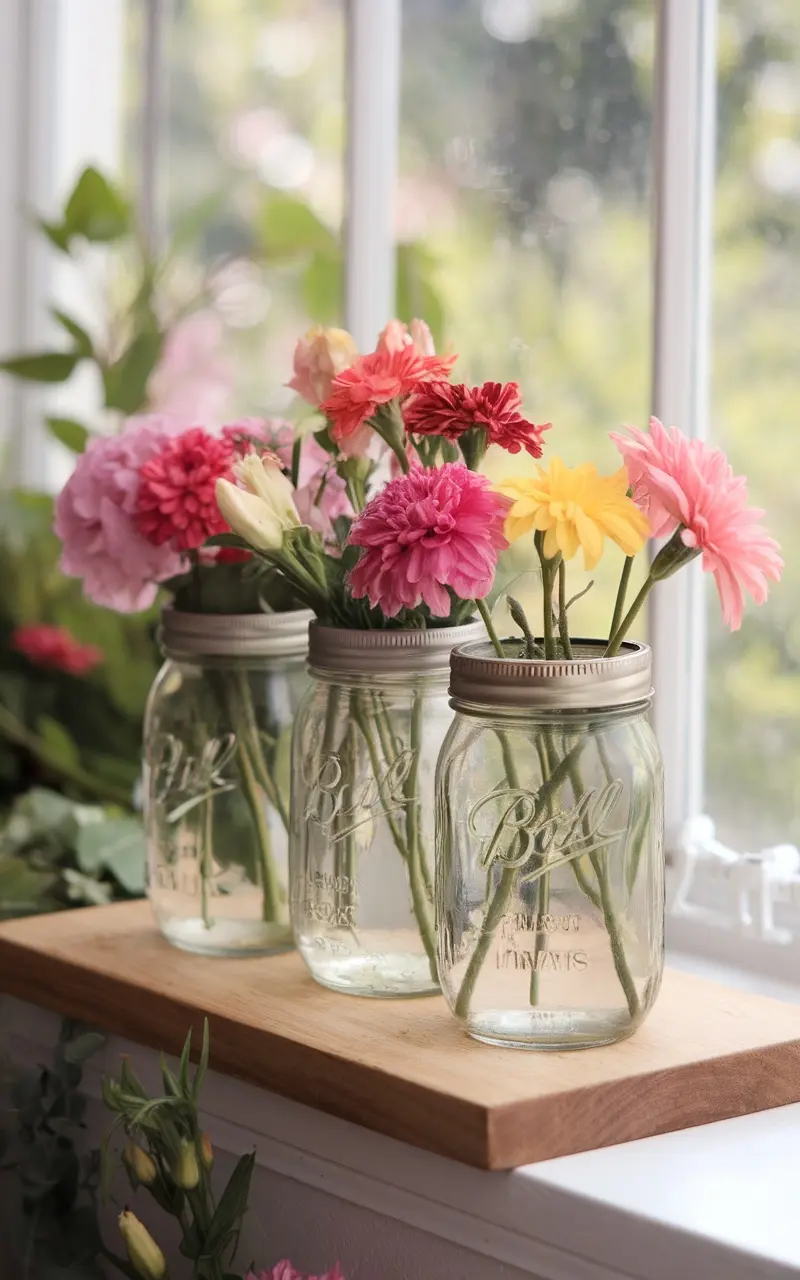
Creating decorative mason jar vases is a delightful way to celebrate Mother’s Day. These charming pieces can brighten up any room and are quite simple to make. By repurposing mason jars, you can add a personal touch to your home decor while showcasing fresh flowers or even dried arrangements.
The process is enjoyable and requires minimal supplies, making it an accessible craft for everyone. You can customize your jars with paint, twine, or ribbons to match your home’s aesthetic. This craft not only brings a pop of color to your space but also serves as a thoughtful gift for loved ones.
What You’ll Need
- 3 mason jars
- Paint (optional, for decorating the jars)
- Twine or ribbon (for embellishing)
- Fresh flowers or greenery
- Scissors
- Water
Instructions
- Decorate the Jars: Begin by painting the mason jars if you choose to add color. Allow them to dry completely. You can also wrap twine or ribbon around the neck of the jars for a rustic look.
- Fill with Water: Once the jars are ready, fill each with water, leaving enough space for the stems.
- Add Flowers: Trim the stems of your fresh flowers or greenery to your desired length and arrange them in the jars. Make sure to mix different types and colors for a vibrant display.
- Display: Place your decorative mason jar vases in a bright spot, like a windowsill or dining table, and enjoy the cheerful ambiance they bring!
Photo Collage Wall Art

Creating a photo collage wall art is a fun and easy way to celebrate memories, especially for special occasions like Mother’s Day. This project lets you showcase favorite photographs in a colorful and creative format, bringing warmth and personality to any room. It’s simple to make, requiring just a few materials, and it can be an enjoyable activity for the whole family.
Begin by gathering your favorite photos and colorful cardstock or scrapbook paper. You can cut the paper into various shapes and sizes to create an interesting backdrop for your photos. Use glue or double-sided tape to secure the photos onto the cardstock, arranging them in a way that feels visually appealing. Personalize your collage with decorative elements like stickers or handwritten notes to add an extra special touch.
What You’ll Need
- Colorful cardstock or scrapbook paper
- Printed photographs
- Scissors
- Glue or double-sided tape
- Decorative items (stickers, washi tape, etc.)
Instructions
- Choose a selection of photos that hold special memories.
- Cut the cardstock into your desired shapes and sizes, mixing colors and patterns for visual interest.
- Arrange the photos on the cardstock, experimenting with different layouts until you find one you love.
- Once satisfied, glue or tape the photos in place.
- Decorate the collage with stickers or handwritten notes to personalize it further.
- Finally, hang your beautiful creation on a wall to enjoy!
Use a mix of black and white and color photos for contrast, and considering a theme or color palette to tie everything together. Enjoy crafting!
DIY Jewelry with Beads and Charms
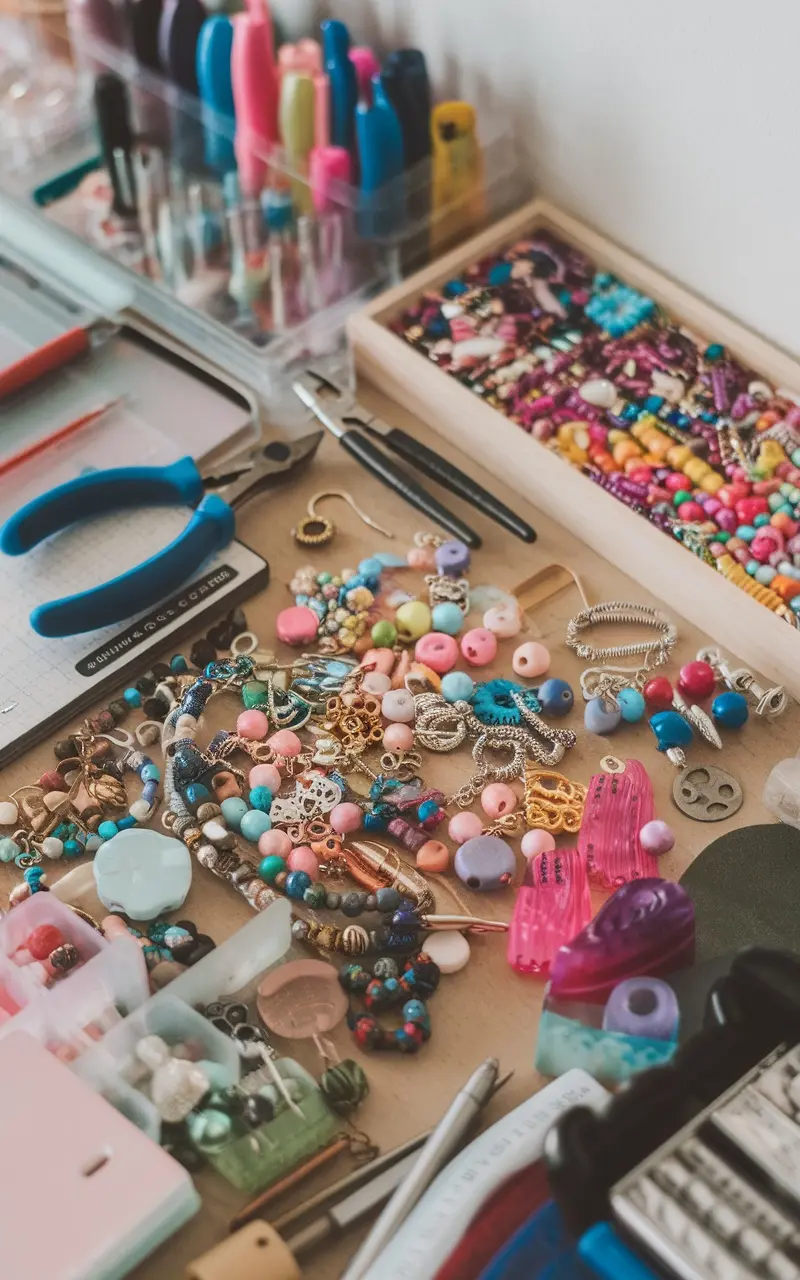
Creating DIY jewelry with beads and charms is a fun and rewarding way to express your creativity. It’s an easy craft project that allows you to design beautiful pieces tailored to your style and personality. With a variety of colorful beads and unique charms, you can make necklaces, bracelets, or earrings that make perfect gifts for Mother’s Day or any special occasion.
This craft is not only simple to make but also provides a great opportunity to bond with friends or family. You can sit together, share ideas, and create unique pieces that hold special meaning. Plus, the feeling of wearing something handmade adds an extra touch of joy. Let’s dive into the materials you’ll need and how to make your jewelry!
What You’ll Need
- Assorted beads (glass, wooden, or plastic)
- Charms (silver, gold, or colored)
- Jewelry wire or elastic thread
- Jewelry pliers
- Scissors
- Clasp (if making a bracelet or necklace)
Instructions
- Gather Your Materials: Start by collecting your beads, charms, wire, and tools. Set up a clean workspace to make the process easier.
- Design Your Piece: Lay out your beads and charms to visualize your design. Feel free to mix colors and shapes to create a unique look.
- String the Beads: Cut a length of wire or thread to your desired length. Begin threading the beads in your chosen pattern, leaving space at the ends for securing.
- Add Charms: Incorporate charms at desired intervals in your design to enhance the look.
- Secure the Ends: If using wire, create a loop at the end and attach a clasp. If using elastic thread, simply knot the ends securely to finish your piece.
- Trim Excess: Use scissors or pliers to trim any excess wire or thread for a neat finish.
Explore different bead combinations before committing to a design, and experimenting with various charm placements to see what looks best. Additionally, consider making matching sets for an extra touch!
Fingerprint Flower Art
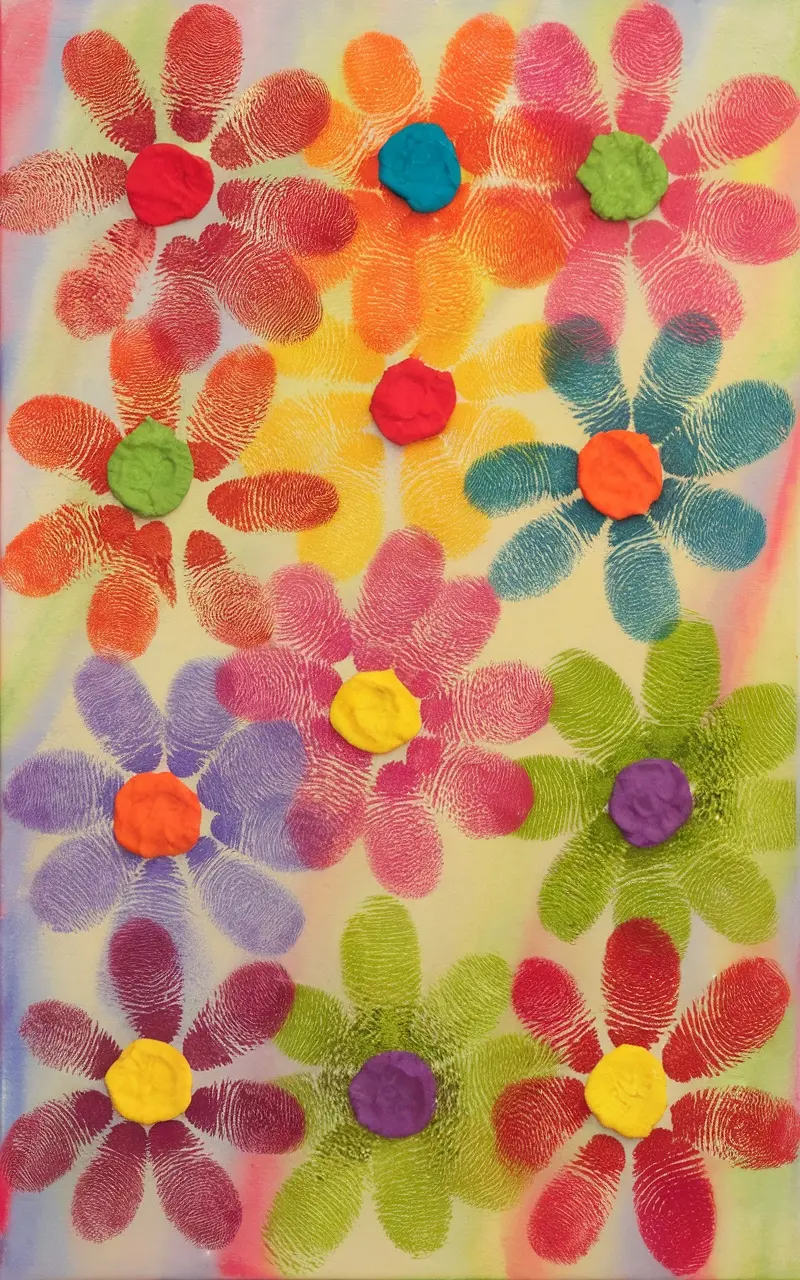
Fingerprint Flower Art is a delightful and simple craft that is perfect for Mother’s Day. It allows kids to create unique and colorful flowers using their fingerprints, making it a memorable keepsake for mom. This hands-on project is not only fun but also encourages creativity and personal expression.
All you need are some washable paints and paper. The process involves dipping fingers in paint and making prints to form flowers, which can be embellished with homemade clay centers. It’s a beautiful way to celebrate the day and can be completed in just a short time!
What You’ll Need
- Washable paint in various colors
- White cardstock or canvas
- Air-dry modeling clay
- Rolling pin
- Cookie cutters or round shapes for clay
Instructions
- Prepare Your Workspace: Lay down newspaper or a plastic cover to protect your surfaces. Gather all your materials.
- Make the Flower Petals: Dip your fingers in your chosen paint and press them onto the paper to form flower petals. Vary colors and angles for a more vibrant look.
- Create the Centers: Roll out the air-dry modeling clay and use cookie cutters or round shapes to cut out small circles. Press these onto the center of each painted flower.
- Let it Dry: Allow the paint and clay to dry completely before displaying your artwork. You can choose to add more details with a marker or additional paint once everything is dry.
Use different finger sizes for varied petal shapes, and encourage kids to mix colors to create new shades. This craft not only makes a lovely gift for Mother’s Day but also serves as a fun family activity!
Embellished Picture Frames
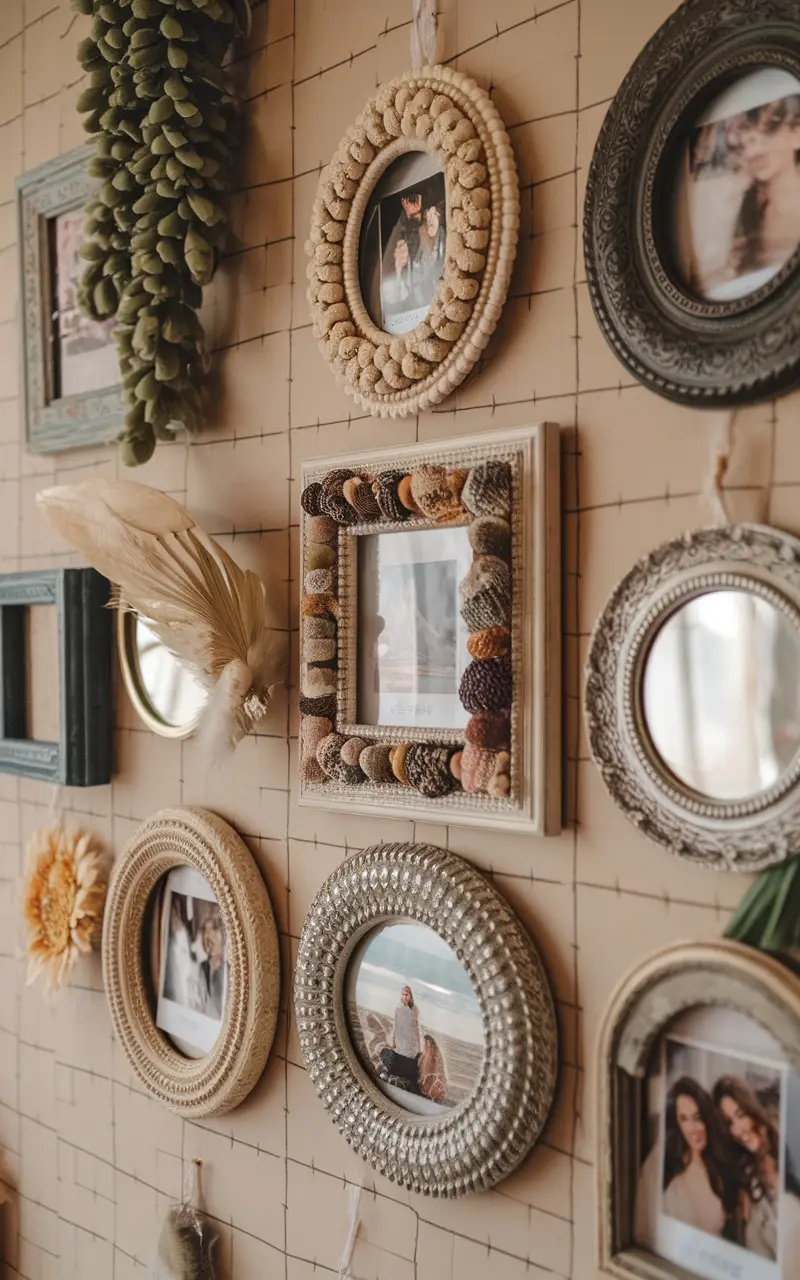
Creating embellished picture frames is a delightful and simple way to showcase your favorite memories and add a personal touch to your home décor. This craft allows for creativity, letting you utilize materials you already have on hand. Plus, it’s an enjoyable project to work on with kids or friends, making it a perfect Mother’s Day activity!
For this project, you can use various decorations such as beads, ribbons, or even dried flowers to create unique designs. The best part is that it doesn’t require any advanced crafting skills, so anyone can join in on the fun. Gather your supplies and get ready to transform ordinary frames into something special!
What You’ll Need
- Wooden or plastic picture frames
- Craft glue or hot glue gun
- Assorted embellishments (beads, ribbons, buttons, or dried flowers)
- Paint or spray paint (optional)
- Scissors
- Photographs or artwork to display
Instructions
- Prepare the Frame: If desired, paint the frame in a color of your choice and let it dry completely.
- Plan Your Design: Lay out your embellishments around the frame to decide on a pleasing arrangement before gluing.
- Glue the Embellishments: Starting with larger items, apply glue and attach them to the frame. Continue adding smaller pieces until you’re happy with the look.
- Insert Your Photo: Once the glue has dried, place your favorite photo or artwork in the frame.
- Display Your Creation: Find a special spot in your home to showcase your newly decorated frame!
Don’t hesitate to mix and match different materials. You can also personalize the frames by incorporating colors that match your home or the favorite hues of your loved ones!
DIY Scented Candles
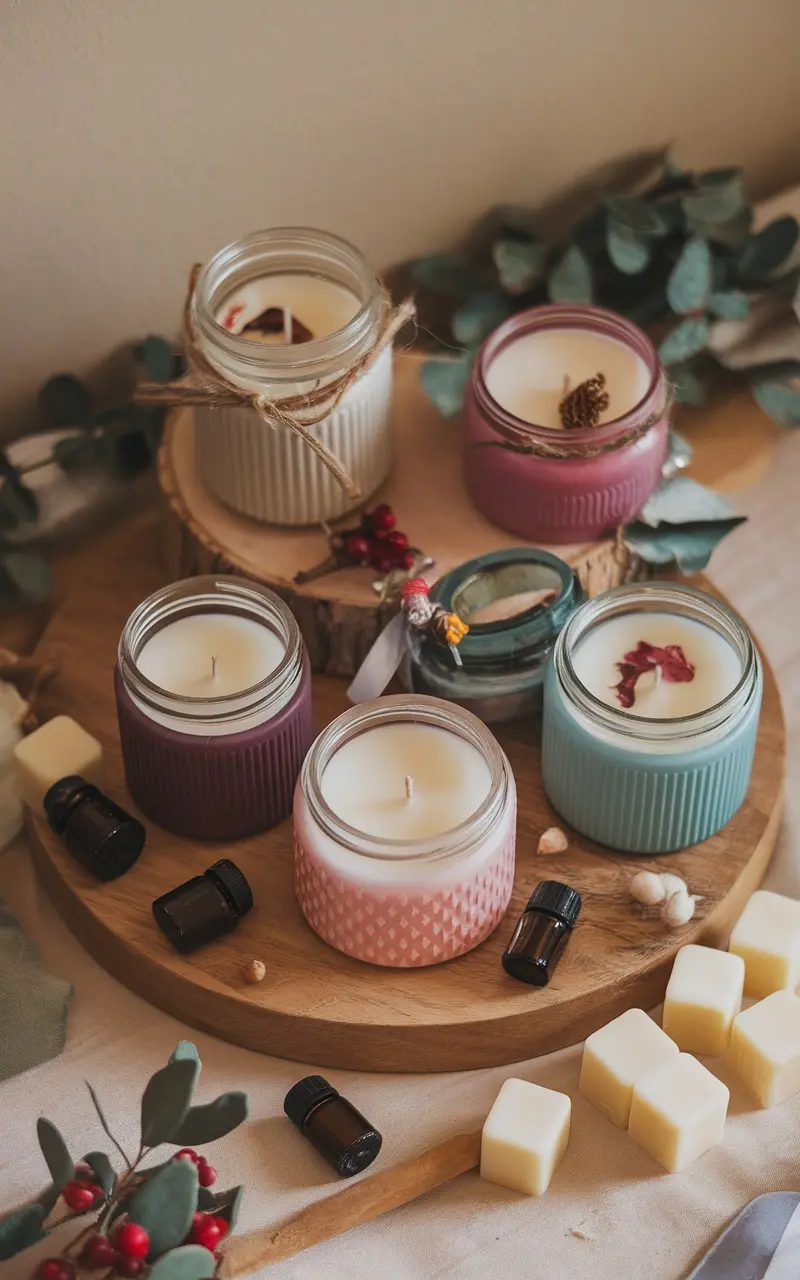
Making your own scented candles is not only a fun and creative activity, but it also results in beautifully aromatic pieces that can brighten up any space. The process is straightforward and doesn’t require any special skills, making it perfect for a Mother’s Day craft. You can personalize scents and colors to suit your taste or your mom’s favorites!
These DIY candles make for thoughtful gifts that show your appreciation. Plus, the warm glow and delightful scents can enhance relaxation and create a cozy atmosphere at home. Whether you choose lavender for calming effects or citrus for an uplifting vibe, the options are endless!
What You’ll Need
- 1 cup soy wax flakes
- 1/2 teaspoon essential oils (your choice)
- Candle wicks
- Containers (glass jars, tin cans, etc.)
- Double boiler or microwave-safe bowl
- Coloring dye (optional)
Instructions
- Prepare Your Workspace: Gather all ingredients and tools. Lay down newspaper or a craft mat to protect your surface.
- Melt the Wax: Using a double boiler or microwave, melt the soy wax flakes until completely liquid. Be careful not to overheat.
- Add Fragrance: Once melted, remove from heat and stir in essential oils and color dye if using. Mix thoroughly.
- Attach the Wick: Secure the wick to the bottom of your container using a small amount of molten wax or a wick sticker.
- Pour the Wax: Slowly pour the melted wax into the container, holding the wick in place. Leave a little space at the top.
- Set and Trim: Allow the candle to cool completely. Once set, trim the wick to about 1/4 inch above the wax.
Consider using different containers to create a more varied collection. You can also add dried flowers, herbs, or spices into the wax for an added touch of beauty and fragrance. Enjoy your crafting time!
Mother’s Day Coupon Book
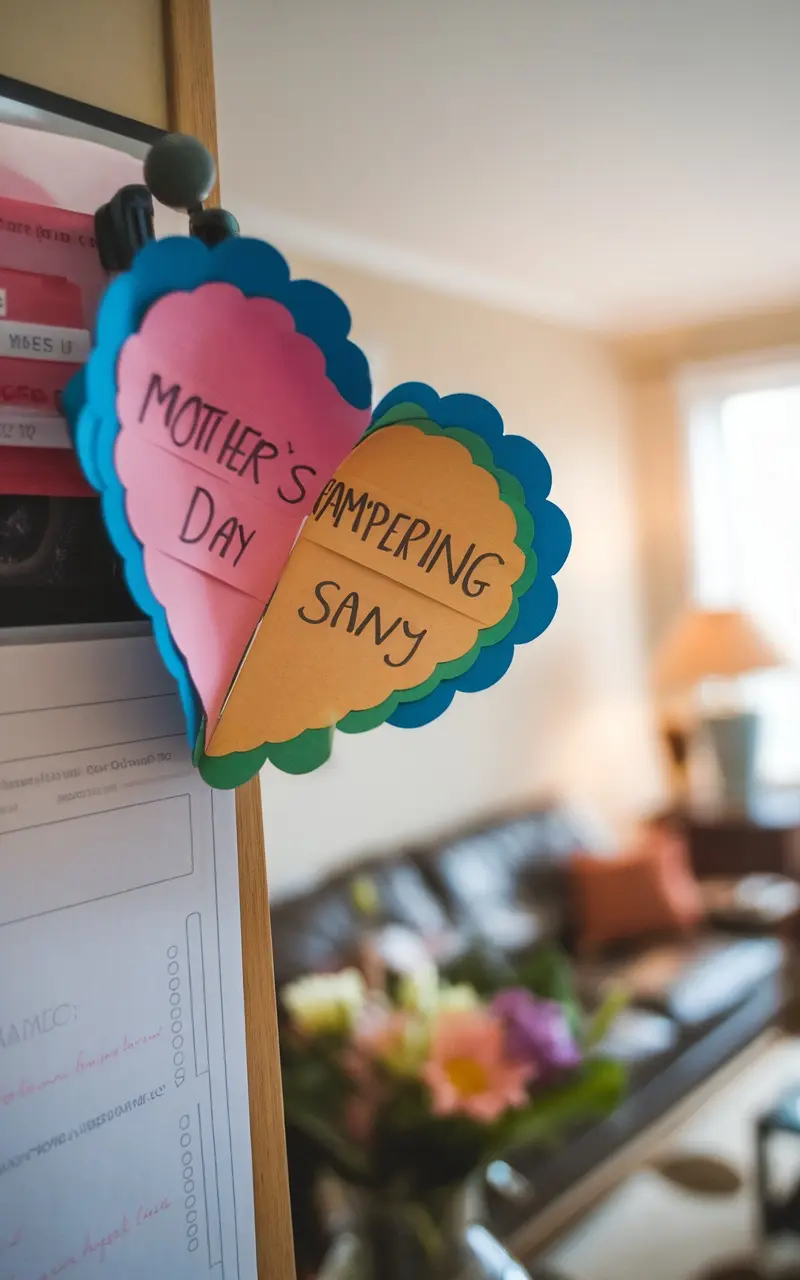
Creating a Mother’s Day coupon book is a fun and thoughtful way to celebrate the special day. This simple project allows kids or partners to craft personalized gifts that offer a variety of services or experiences, such as a day of pampering, cooking a favorite meal, or a movie night at home. It’s not only a creative outlet but also a gesture that can bring joy and cherished moments between family members.
To get started, gather some colorful paper or cardstock, scissors, and markers. You can design each coupon to represent different activities or treats. Encourage creativity by adding drawings or decorative elements. Once finished, tie the coupons together with a ribbon or string for a charming presentation. This coupon book is a delightful gift that shows appreciation while encouraging quality time spent together.
What You’ll Need
- Colorful cardstock or paper
- Scissors
- Markers or pens
- Ruler
- Pencil
- Ribbon or string
Instructions
- Cut the Cardstock: Use the ruler and pencil to measure and mark out rectangles on the cardstock for your coupons. Cut them out carefully.
- Design the Coupons: On each piece of cardstock, write down a special offer or activity. Examples could include ‘One Free Family Movie Night’ or ‘A Handwritten Letter of Appreciation.’
- Add Decorations: Make the coupons visually appealing by adding drawings, stickers, or other embellishments that reflect the offers.
- Assemble the Book: Stack the coupons neatly and use the ribbon or string to tie them together securely.
- Present with Love: Gift the coupon book on Mother’s Day, encouraging the recipient to redeem the offers throughout the year.
Beaded Keychains for Mom
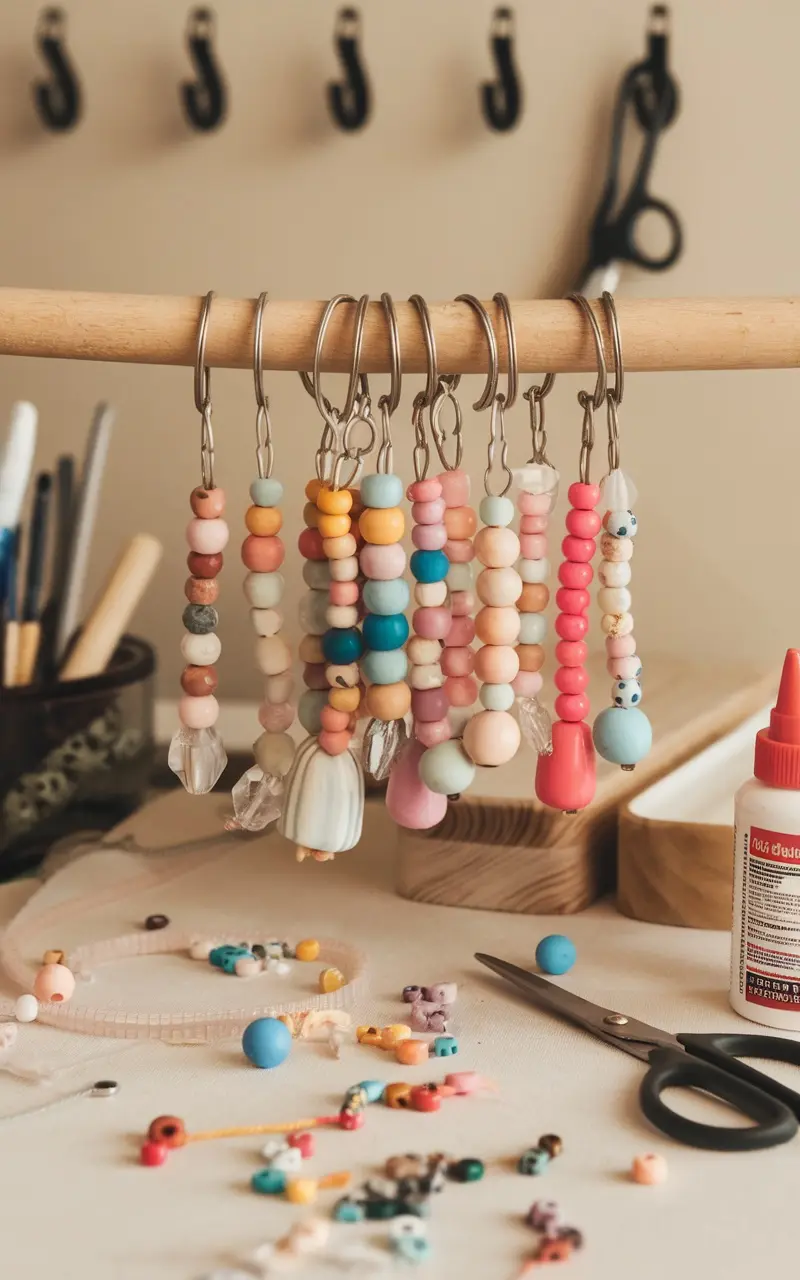
Beaded keychains are a delightful way to show your love and appreciation for mom. They’re colorful, personal, and simple to create, making them an ideal craft for kids and adults alike. This project allows for creativity while also resulting in a functional gift that mom can carry with her everywhere.
Gather some beads and keychain rings, and let your imagination run wild. You can choose different colors and patterns to represent what your mom loves. These keychains are not only quick to make but also provide a heartfelt touch that will surely bring a smile to her face.
What You’ll Need
- Assorted beads (wooden, glass, etc.)
- Keychain rings
- Strong string or elastic cord
- Scissors
- Glue (optional, for securing knots)
Instructions
- Choose Your Beads: Select a variety of beads that you think your mom would love. Think about her favorite colors and styles.
- Cut the String: Measure a piece of string or elastic cord about 12 inches long, allowing enough length to tie off at the end.
- String the Beads: Start threading beads onto the string. You can create a pattern or mix them up for a playful look. Leave some space at the end for the knot.
- Tie It Off: Once you’re happy with the arrangement, tie a strong knot at the end of the string to secure the beads. If needed, add a drop of glue to hold the knot in place.
- Attach to Keychain: Loop the finished bead strand through the keychain ring and pull it tight. Your beaded keychain is now ready for mom!
For added flair, consider adding charms or initials that represent your mom. You can also make matching keychains for siblings to gift together.
Nature-Inspired Wall Hanging
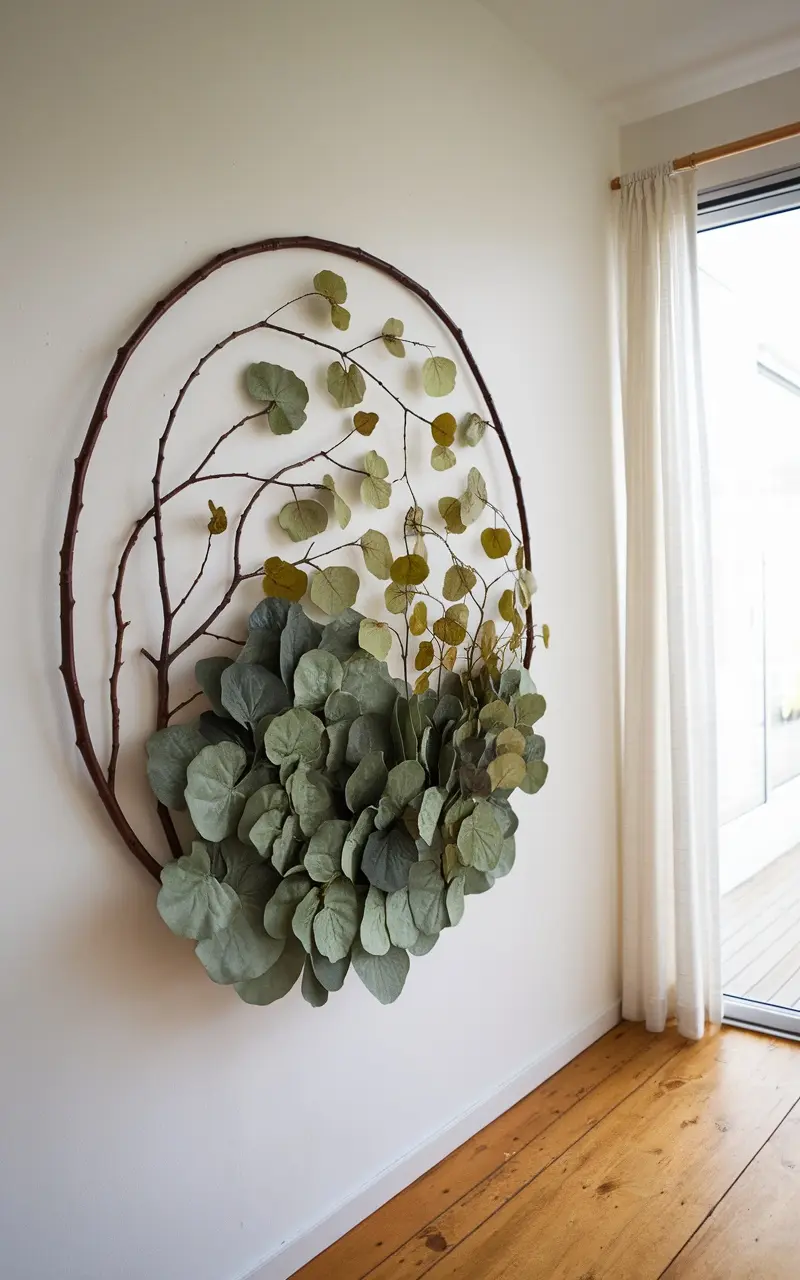
Creating a nature-inspired wall hanging is a delightful way to bring the outdoors inside. This project combines different textures and colors from natural elements, resulting in a piece that not only enhances your home decor but also serves as a heartfelt gift for Mother’s Day. The beauty of this craft lies in its simplicity; anyone can make it, regardless of their crafting experience.
Gathering materials like twigs, dried leaves, and even flowers makes for a personal touch. You can customize this wall hanging to reflect the season or your favorite colors, making it a unique addition to any room. Plus, it’s a wonderful way to spend time outdoors collecting your materials!
What You’ll Need
- Various twigs (about 10-15)
- Dried leaves (mixed colors and shapes)
- Floral wire or twine
- Scissors
- Wire cutters (if needed)
- A round hoop or a simple circular frame
Instructions
- Gather your materials from your garden or local park.
- Start by arranging the twigs in a circular shape, securing them with floral wire or twine to create the base.
- Once your base is ready, begin adding the dried leaves by tucking them into the twigs. Secure them with more wire or twine as necessary.
- Mix different types of leaves for visual interest, layering them to create depth.
- Hang your completed wall hanging in a spot where it can truly shine, like above a sofa or in a hallway.
For an added touch, consider adding a personalized note or small photo in the center of your wall hanging. This extra detail can make it even more special for Mother’s Day. Enjoy the process and let your creativity flow!
Scrapbook of Memories
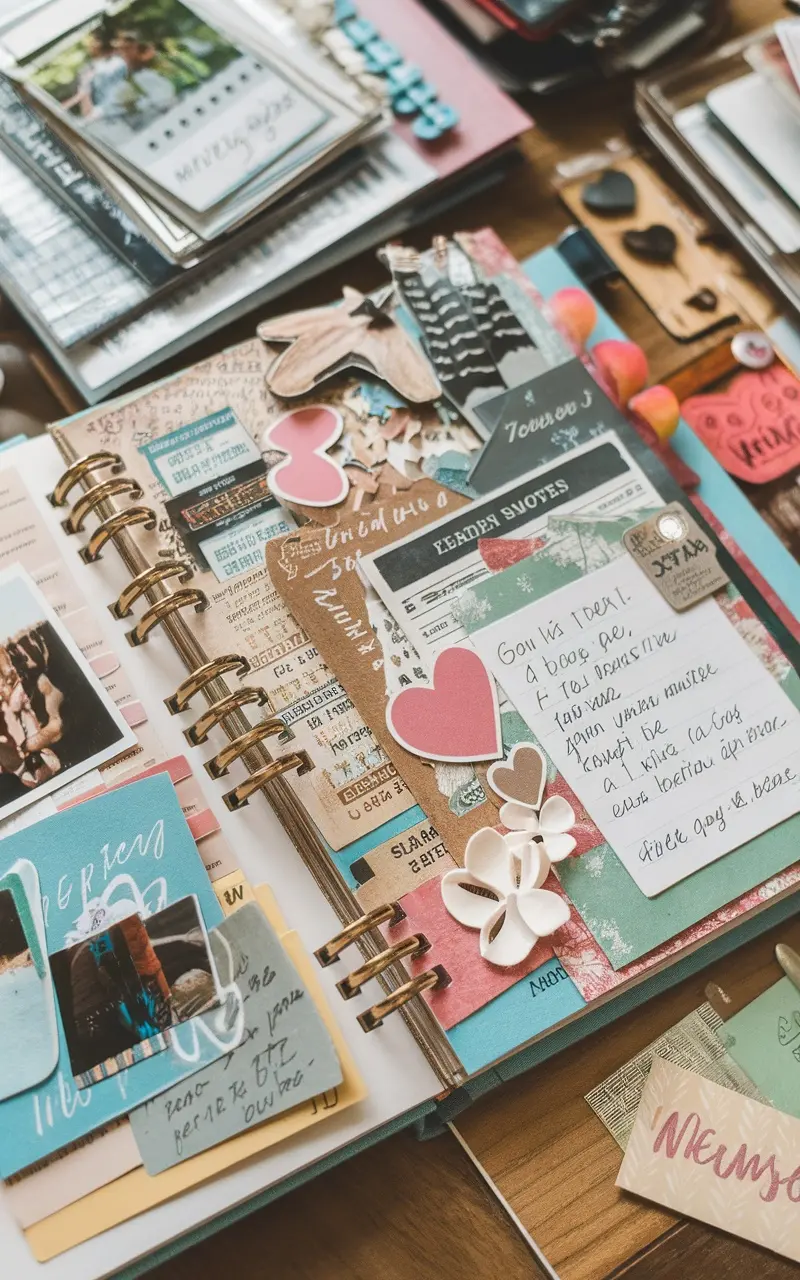
Creating a scrapbook of memories is a delightful way to celebrate special moments, especially for Mother’s Day. This project combines creativity with nostalgia, making it simple yet meaningful. The process allows you to gather photos, notes, and little mementos that tell a story, providing a tangible way to cherish experiences together.
Scrapbooking is not just about sticking pictures; it’s an artistic expression that invites you to get crafty. Use colorful paper, stickers, and handwritten notes to personalize each page. It’s an enjoyable activity that brings the family together and results in a keepsake that can be treasured for years.
What You’ll Need
- Photo prints
- Craft paper in various colors
- Stickers and embellishments
- Adhesive (glue or double-sided tape)
- Scissors
- Markers or pens for writing
- Memory prompts (like event dates or quotes)
Instructions
- Gather your materials: Collect photos and any other memorabilia you want to include, like ticket stubs or notes.
- Choose your layout: Decide how you want to arrange your items on each page. You can create themes, like family vacations or birthday parties.
- Attach items: Use glue or double-sided tape to secure your photos and decorations. Don’t be afraid to overlap or create layers for visual interest.
- Add personal touches: Write captions, quotes, or short anecdotes next to the photos to capture the memories. Get creative with fonts and colors!
- Finish your scrapbook: Once you’re satisfied with your pages, take a moment to look through and enjoy the memories you’ve documented. Consider adding a cover page or title for an extra touch.
Set aside dedicated time to work on the scrapbook with family members. Gather everyone’s contributions for a collective memory-making experience, and don’t hesitate to let kids add their artistic flair!
Leave a Reply