
Creating Easter stained glass crafts with kids is a blast! Grab your materials: grease-proof paper, felt markers, tissue paper, and Modge Podge. First, set up your craft area – don’t let the table get messy! Next, rip tissue paper into fun pieces and arrange them on the contact paper. A thin adhesive layer makes it really pop, like magic stained glass! Finally, hang your masterpiece in a sunny spot for an eye-catching display. Want to make it even more awesome? There’s more to explore!
Key Takeaways
- Gather materials like grease-proof paper, felt-tipped markers, scissors, and black cardboard for Easter-themed stained glass crafts.
- Prepare a clean, flat surface with newspaper and good lighting to ensure visibility and protect the workspace.
- Tear and arrange colorful tissue paper pieces into a mosaic pattern on the grease-proof paper base.
- Apply Modge Podge or adhesive over the design, securing tissue paper with a sponge brush for a stained glass effect.
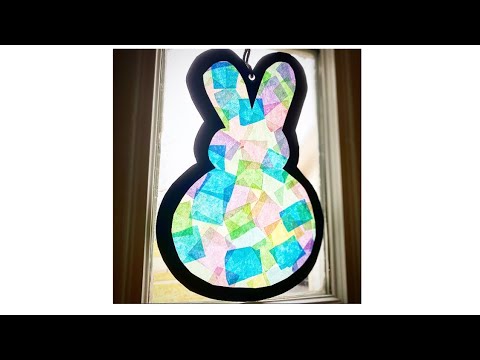
- Display the finished art in sunny windows using sticky tape or adhesive putty to enhance the vibrant colors.
Gather Your Materials
Before diving into the colorful world of Easter stained glass crafts, it’s time to gather your materials and set up a creative station. Start with grease-proof paper as your base—it’s perfect for showing off those bright, cheerful colors.
Grab some felt-tipped markers; they’re the secret ingredient to making your stained glass Easter egg pop with vibrant hues. Don’t forget the ruler for outlining clean, straight lines—precision is key!
Scissors are a must for cutting out those delightful Easter shapes, like eggs or bunnies. If you’re feeling fancy, a piece of black cardboard can frame your masterpiece, giving it a true stained glass vibe.
And hey, maybe even add some colorful tissue paper Easter designs for extra flair!
Prepare the Craft Surface
Crafting time is here, and it’s all about setting the stage for some colorful creativity. First, choose a clean, flat craft surface like a sturdy table or countertop—no wobbly desks allowed! Protect this precious surface with a trusty protective covering such as newspaper or a tablecloth. This way, any wild glue or ink spills are no biggie. A well-lit area helps spot those sneaky details, so make sure the lighting is bright. Gather all the materials needed, like contact paper, tissue paper, and scissors, to create an organized workspace. To keep everything steady, use painter’s tape or masking tape for securing the edges.
Here’s a quick look at the setup:
| Item | Purpose |
|---|---|
| Flat craft surface | Stability for crafting |
| Protective covering | Prevents stains |
| Good lighting | Visibility for details |
| Materials needed | Contact paper, tissue, scissors |
| Painter’s tape | Secures edges, prevents slipping |
Tear and Arrange Tissue Paper

Rip and tear, it’s time to release the fun with tissue paper! Kids can plunge into the colorful world of Easter art by tearing tissue paper into 1-2 inch pieces.
This egg shaped adventure not only hones fine motor skills but also provides a delightful tactile experience. Encouraged to use a rainbow of colors, children can create vibrant designs fit for sunlight.
As they arrange the pieces, they learn the art of placement—close together but not too overlapping. This guarantees each color stands out in their Easter art masterpiece.
With freedom to explore patterns and shapes, their creativity can truly shine. The finished egg shaped design, once complete, becomes a mosaic of color, ready to brighten any window.
Apply Adhesive and Secure Design
Once those colorful pieces of tissue paper are all set, it’s time to get sticky!
First, they should grab their Modge Podge or any adhesive and apply a thin layer over the design area. This step makes certain that those vibrant tissue paper bits stick like magic.
When placing the tissue paper, overlapping them slightly adds a cool stained glass effect. Next, they can use a sponge brush to apply adhesive over the tissue paper, securing all edges and making those colors pop!
If contact paper is handy, they should peel the backing and press the sticky side onto the design to seal it. For extra strength, adding another contact paper layer on top guarantees everything stays put—no runaway pieces here!
Display Your Finished Art

The moment of truth is here—it’s time to display your dazzling stained glass masterpieces! Imagine your egg-shaped crafts bathing in vibrant colors as sunlight streams through.
Kids will love seeing their creations come to life in a sunny window. To display your finished art, use rolled-up sticky tape or adhesive putty for easy, no-damage placement.
Experiment with different heights and angles, making a fun game out of finding the perfect spot. Perhaps create a mobile display using a curtain rod or string, letting the pieces jiggle and dance in the breeze.
Encourage kids to choose where their eggs will hang, boosting their pride and joy. After all, nothing beats the satisfaction of seeing their hard work shine bright!
Frequently Asked Questions
How to Create Stained Glass Art for Kids?
Creating stained glass art for kids involves using kid-friendly materials like contact paper and tissue paper. By employing creative techniques, children can craft colorful designs with festive themes, enhancing their artistic skills and enjoying a delightful experience.
How Is Stained Glass Made Step by Step?
Stained glass is crafted by glass cutting and color selection, followed by adhesive application to secure pieces. Panel assembly involves arranging designs and soldering joints, enhancing with patina, and polishing for brilliance and ideal light transmission.
What Can I Make for Easter Crafts?
For Easter crafts, one can create Easter egg decorations, bunny masks, spring flower wreaths, and festive table centerpieces. Each craft offers a unique way to celebrate the holiday, fostering creativity and joy in the seasonal festivities.
How to Make Paper Look Like Stained Glass?
To make paper resemble stained glass, one can explore paper techniques like using grease-proof paper with bold outlines. Experiment with color mixing and adhesive options. Find design inspiration in traditional stained glass patterns for an authentic look.
Conclusion
And there you have it! With just a few easy steps, you and your kids have created some fantastic Easter stained glass art. It’s not just about the art itself, but also the fun memories you’ve made along the way. Watching the sunlight dance through your colorful creations is like a little daily celebration. So, go ahead, hang them up, show them off, and enjoy the burst of color and joy they bring to your home!
Leave a Reply