
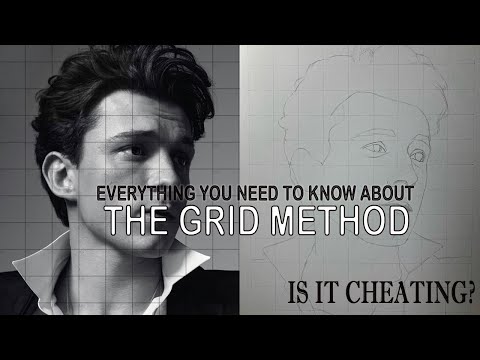
The grid drawing method is a simple trick that helps artists create accurate sketches. By placing a grid over a reference photo and drawing a matching grid on paper, artists can copy one square at a time, making complex subjects more manageable. This technique has been used since ancient times by masters like da Vinci and Vermeer. All you need is a ruler, pencil, and eraser to transform challenging projects into achievable masterpieces. The grid’s magic awaits your artistic touch.
Key Takeaways
- Grid drawing tools divide reference images and drawing surfaces into equal squares to help accurately transfer proportions and details.
- Essential materials include a ruler, light pencil, kneaded eraser, reference photo, and drawing surface for successful grid implementation.
- Start with central features and work outward, focusing on one square at a time for precise placement and proportion.
- Digital grid tools offer customizable overlays with adjustable size, color, and opacity for enhanced precision and convenience.
- The technique benefits all skill levels, from beginners learning proportion to experienced artists saving time on complex subjects.
Numeric List of 15 Second-Level Headings

Each heading opens a doorway to important skills, arranged from simple to complex.
This organization means you’ll never get lost or overwhelmed as you learn.
What Is the Grid Drawing Method?
Artists everywhere have discovered a secret weapon for creating amazingly accurate drawings – the grid method! This clever grid drawing technique transforms even the most challenging subjects into manageable pieces that anyone can draw.
The method works by placing a grid over a reference photo, then creating an identical grid on your drawing paper. Instead of tackling the whole image at once (yikes!), you focus on just one square at a time. Each little section becomes way easier to copy accurately, helping nail those tricky proportions that might otherwise look wonky.
Famous artists like Leonardo da Vinci used this same trick! With a simple three-by-three grid, you’ll be amazed how quickly your drawing skills improve as you learn to really see shapes and relationships between elements.
Historical Use of Grids in Art

While many think of the grid as a modern tool, this clever drawing trick has actually been around for thousands of years! Ancient Egyptians and Greeks used grids to get the perfect proportions in their artwork, long before computers or fancy art supplies existed.
The grid method became super popular during the Renaissance, when masters like Leonardo da Vinci used it to create incredibly accurate paintings and drawings. Can you imagine Da Vinci hunched over his work, carefully transferring images square by square? Amazing!
Artists for centuries, including Vermeer and Van Eyck, relied on grid techniques to nail those tricky perspectives and tiny details.
Today’s art teachers still show students this time-tested technique because, honestly, it just works!
Materials Needed for Grid Drawing
Before jumping into your grid drawing adventure, it’s essential to gather all the right tools for success! First on the list is a clear acrylic ruler, which will help you create perfect grid lines on both your reference image and drawing surface.
You’ll also need a 2H pencil—it makes light marks that won’t destroy your paper when you erase them later!
Don’t forget a kneaded eraser, the artist’s best friend! It lifts graphite without leaving annoying residue behind.
Make sure you have a paper copy of your reference image sized to match your final drawing dimensions.
And finally, choose a sturdy surface like watercolour paper or canvas that can handle all your drawing and erasing.
With these tools ready, you’re all set to create amazing, accurate art!
Setting Up Your Reference Photo Grid
Now that you’ve gathered all your materials, the real magic begins with preparing your reference photo! Start by printing a clear copy at the exact size you want your final artwork to be.
Grab your ruler and make small marks at consistent intervals—every half inch or inch works great—along all four edges. Connect these marks with light, straight pencil lines to create your grid.
Don’t press too hard, or you’ll mess up your reference! Make sure your grid matches the one you’ll draw on your blank paper.
For super-easy navigation during the drawing process, label each row with letters and each column with numbers. This way, when you’re stuck on an eye or nose, you can find exactly where you are!
Creating a Matching Grid on Your Canvas
Once your reference photo is properly gridded, it’s time for the really fun part—creating an identical grid on your blank canvas!
Grab your ruler and start by measuring the exact same intervals along each edge as you did on your reference. Make super light marks—trust me, you’ll thank yourself later when it’s erasing time!
Mark your canvas intervals lightly—your future self will appreciate it when those grid lines need to disappear!
Connect those dots with straight lines, being careful not to press too hard with your pencil. Oops! Double-check your counting—having 8 columns on your reference but only 7 on your canvas would be a disaster!
The whole point of this grid magic is making sure everything stays perfectly proportional.
When your canvas grid exactly matches your reference grid, you’re ready for the exciting part—transforming those empty squares into amazing art!
Transferring Images Square by Square
When transferring your image square by square, remember that scale directly impacts the accuracy of your final drawing.
Artists often number each square (A1, A2, B1, etc.) to avoid confusion and make the process more systematic.
The most effective technique involves starting with the central features of your subject and working outward, ensuring that the most important elements are positioned correctly before adding surrounding details.
Scale Matters
The magic of grid drawing lies in its square-by-square approach, which transforms complex images into manageable pieces anyone can tackle.
When choosing your grid size, remember that bigger isn’t always better! The scale of your grid directly affects how much detail you can capture in your drawing.
Here’s why scale matters so much:
- A smaller grid size (more squares) lets you catch tiny details that might otherwise get lost.
- Drawing your grid with consistent measurements guarantees your final image stays proportional.
- Having more reference points helps beginners spot mistakes quickly before they become major problems.
When transferring images, make certain the grid on your reference matches your drawing paper’s grid—otherwise, your masterpiece might end up looking like a funhouse mirror reflection!
Number Each Square
Now that you understand how scale impacts your grid drawing, let’s jump into a game-changing technique that organizes your entire process! Numbering each square on both your reference and drawing grid is like creating a roadmap for your artistic journey.
Start in the top left corner (square #1) and work across each row. This simple system transforms a complex image into bite-sized, manageable chunks! When you place numbers on your grid over your reference, you’ll never lose track of where you are.
The magic happens when you transfer what you see in each numbered square to its corresponding square on your drawing. If you need a break, no problem! Those numbers make it super easy to jump right back in.
Your brain will thank you for breaking down the impossible into totally doable pieces!
Start Inside Out
Many artists discover that the true secret to grid drawing lies in working systematically, square by square, much like solving a puzzle one piece at a time. When transferring images using this method, grab your ruler and begin with the top left square, focusing completely on capturing the exact lines and shapes in that single area before moving on.
- After drawing a grid on both your reference image and blank paper, start in the upper left corner (usually labeled A1) and work your way across and down.
- Use transfer paper underneath tricky areas if you’re struggling with complex details.
- Pay super-close attention to where lines cross within each square—these intersection points are like treasure maps to perfect proportions!
Once you’ve completed all squares, gently erase the grid lines for your finished masterpiece.
Tips for Maintaining Proper Proportions
Accurate proportions form the backbone of any successful grid drawing, transforming a jumble of lines into a recognizable masterpiece! When working with a grid, matching the size of squares between your reference photo and drawing paper is super important. One tiny mistake can make your portrait look wonky!
| Proportion Tips | Why It Matters |
|---|---|
| Match grid sizes exactly | Prevents distortion |
| Use a ruler for grid lines | Creates precision |
| Focus on one square at a time | Maintains accuracy |
| Step back and check often | Catches errors early |
| Try different grid sizes | Adapts to detail needs |
Remember to regularly compare your drawing to the reference photo. This helps you spot and fix proportion problems before they ruin your artwork. Trust the grid system—it’s like having artistic training wheels!
Common Mistakes to Avoid When Using Grids
Even the best grid artists stumble sometimes! When transferring an image using the grid method, watching out for common pitfalls can save you from frustration and keep your artwork looking awesome.
- Mismatched grid sizes – Always make sure the squares on your drawing surface match the size of those on your original image, or your proportions will be totally off!
- Heavy-handed grid lines – Drawing lines too darkly makes them super hard to erase later, leaving annoying marks that can ruin your final piece.
- Inconsistent spacing – When your grid lines aren’t evenly spaced, parts of your drawing end up squished or stretched in weird ways, making your artwork look different from the original image.
Grid Drawing for Beginners vs. Advanced Artists
The grid method serves different purposes for artists at various skill levels, with beginners finding it a helpful training tool for developing accuracy and proportion.
While novice artists typically rely on simple 3×3 grids to transfer basic shapes, advanced artists customize their grid complexity based on the artwork’s intricacy.
Experienced artists often view the grid as a time-saving technique rather than a learning aid, using it strategically to tackle complex compositions while maintaining their creative freedom.
Beginner’s Grid Guide
While mastering artistic skills often takes years of practice, the grid method offers a shortcut that benefits both novice and seasoned artists alike. For beginners, this approach transforms intimidating projects into manageable pieces, making accurate drawings achievable from day one!
Beginners should embrace these grid method basics:
- Start with a simple 3×3 grid on both your reference photo and drawing paper.
- Focus on one square at a time, ignoring the overwhelming complexity of the whole image.
- Check proportions constantly by comparing your grid squares to the reference squares.
The beauty of this method is how quickly it builds confidence. As beginners tackle each tiny section, they’re secretly developing essential observational skills while creating surprisingly accurate artwork.
With consistent practice, those training wheels eventually come off!
Advanced Grid Techniques
As artists grow more comfortable with basic grid methods, a world of advanced techniques opens up to enhance their work. Advanced artists often move beyond the simple 3×3 arrangement to 5×5 or even custom-sized grids that match the complexity of their subjects.
These sophisticated grids reveal incredible detail—perfect for capturing the sparkle in an eye or the texture of fur!
While beginners sketch light pencil marks that can be erased, pros might use artist tape for super-clean lines. Many advanced artists also embrace technology through grid overlay apps that let them adjust grid sizes instantly or zoom into tricky sections.
These digital tools save time but still require the same sharp observation skills that make grid drawing so powerful in the first place!
Digital Grid Drawing Tools and Apps
Many digital grid drawing tools have revolutionized how artists approach sketching, turning what was once a tedious process into a breeze. These apps allow artists to overlay customizable grids directly onto photo references, which seriously helps improve your drawing accuracy without measuring anything by hand!
Digital grid tools transform sketching from tedious to effortless by overlaying customizable grids on photo references for instant accuracy.
- Choose your grid size, color, and opacity to work best with your specific reference image.
- Save your grids and sketches for easy access later (no more starting over!).
- Use bonus features like zoom, sketch filters, and point plotting for extra precision.
Gone are the days of rulers and pencil marks on physical photos! Digital grid drawing tools let artists work anywhere, anytime, making it super convenient for on-the-go creativity or when working with digital references.
Adapting Grid Sizes for Different Projects
Choosing the right grid size for your art project can make a huge difference in your final results! When working with a reference photo, you’ll want to match your grid to both the complexity of your image and your canvas size. Super detailed drawings? Go with smaller grid sizes like ½ inch squares.
Working on something simpler? Larger 1-inch squares will do the trick!
For huge canvases, try a simple 3×3 grid to keep things manageable—nobody wants to get lost in tiny squares! The magic trick is maintaining a consistent ratio between your reference photo and your drawing surface. This consistency guarantees accurate reproduction of your image.
Beyond the Basics: Advanced Grid Techniques
Artists who’ve mastered the basics can explore exciting advanced grid techniques to level-up their drawings.
Non-uniform grid patterns, with smaller squares for detailed areas and larger ones for simpler sections, help tackle complex subjects without getting overwhelmed.
Digital grid apps now integrate seamlessly with traditional art, offering customizable grid colors and opacity settings that make tracing reference images easier than ever before.
Non-uniform Grid Patterns
Traditional grids with their neat, identical squares work great for many projects, but when tackling complex subjects, non-uniform grid patterns offer exciting new possibilities.
These customizable grids allow artists to place more focus on intricate areas while simplifying less detailed sections, boosting both accurate placement and artistic expression.
When working with non-uniform grids, remember:
- Outline key features of your reference image first, then create varying grid sizes around them.
- Make smaller grid sections for complex areas (like faces or detailed textures).
- Use larger sections for simpler areas (like backgrounds or uniform surfaces).
This technique is super helpful for drawing people, animals, or scenery with tricky proportions.
Digital Grid Integration
While traditional grid methods remain effective, the digital revolution has transformed how artists approach grid-based drawing. Apps now allow users to overlay customizable grids directly onto reference images, eliminating the tedious task of drawing grids by hand. Talk about a time-saver!
Digital grid integration boosts accuracy while making the drawing process way more flexible. Artists can instantly adjust grid size, color, and opacity to perfectly match their vision.
Plus, these digital tools often come packed with cool extras like sketching filters and zoom features that let you really get into those tiny details.
For artists working with digital images, these tools are game-changers! You can resize grids in seconds to match your drawing paper, avoiding the math headaches and potential mistakes of manual grid creation.
Perspective Grid Systems
Perspective grids take sketching to a whole new dimension—literally! Artists use these special grid systems to create the illusion of depth on flat paper. By setting up vanishing points and horizon lines, perspective grids help make drawings look like real 3D spaces rather than flat images.
When working with perspective grids, artists can:
- Create custom grids based on their chosen viewpoint
- Use digital tools to quickly adjust dimensions for complex scenes
- Practice spatial relationships to make more convincing artwork
The coolest thing? These grid systems aren’t just for pro artists! Even beginners can use perspective grids to draw awesome cityscapes or room interiors.
With some practice, you’ll start to see how objects should shrink and shift as they move away from the viewer—making your art pop with realistic depth!
When to Use (and When Not to Use) Grid Drawing
When should an artist reach for the grid method tool in their creative toolkit? The answer depends on what they’re trying to achieve. The grid method shines when tackling complex compositions where accuracy matters most. It’s like training wheels for artists who struggle with freehand drawing, offering a structured path to nail those tricky proportions!
| Project Type | Grid? | Why? |
|---|---|---|
| Realistic Portrait | YES! | Precision is key |
| Quick Nature Sketch | NOPE | Kills spontaneity |
| Enlarging Artwork | YOU BET! | Maintains proportions |
But watch out—using grids for everything might become a crutch! Balance is vital. Mixing grid work with freehand practice helps develop both skills, so you’re not stuck forever connecting dots like a kindergarten worksheet!
From Grid to Finished Artwork: Erasing Your Guide Lines
Transforming your grid-lined sketch into a polished masterpiece requires one essential final step—removing those helpful but now distracting guide lines! After using the grid method to transfer your image perfectly, it’s time to make those pencil lines disappear like magic. Wait until your artwork is completely dry before reaching for that eraser!
The final artistic transformation happens when grid lines vanish, revealing your true masterpiece hidden beneath those guiding marks.
- Grab a kneaded eraser and gently press it against grid lines—don’t rub or you’ll smudge your awesome work!
- Work from top to bottom, erasing lightly to protect your finished drawing underneath.
- Only erase the grid when you’re absolutely sure your artwork is complete—this prevents any “oops” moments during final touches!
Once those guide lines vanish, your artwork will truly shine, ready for framing or showing off to impressed friends!
Frequently Asked Questions
How Do You Use the Grid Method in Sketching?
The grid method enhances sketching accuracy by dividing reference images into squares. Artists transfer visual proportions square-by-square onto their drawing surface, ensuring proper grid techniques throughout the process.
Is Grid Drawing Good for Beginners?
Grid drawing ranks among effective beginner techniques, boosting sketching confidence by simplifying proportions. This method provides foundational skills that support long-term artistic development through improved observational abilities.
What Are the Advantages of Using Grid Paper for Sketching?
Grid paper benefits artists by providing structural guidance for precision drawing. This artistic technique helps maintain proportions, simplifies complex subjects into manageable sections, and enhances observational skills through systematic reference points.
What Artists Use the Grid Method?
Famous artists like da Vinci and Dürer employed the grid method historically, while contemporary creators adapt modern techniques for creative applications ranging from realistic portraiture to abstract design.
Conclusion
Grid drawing is truly a superpower for artists of all skill levels. With just a few simple lines, anyone can transform a blank page into an accurate masterpiece! While it takes practice, this technique builds confidence and develops your artistic eye. Next time you’re struggling with proportions, grab a ruler and try the grid method. Remember, even the masters used this trick—it’s not cheating, it’s smart drawing!
Leave a Reply