
Looking for cool doodle page ideas? Try spiral op-art and wavy rainbow lines for mind-bending patterns, or draw fields of clover teardrops and oversized, layered flowers for a nature vibe. Splash some Keith Haring-style doodles—full of energy—or make cow print blobs for laughs. You can create mountains with lines, wheels with spokes, or fake dripping paint for extra drama, and don’t forget wagon wheel circles. Each idea brings a new twist, so gear up for even more sketchbook fun next!
Key Takeaways
- Experiment with hypnotic spiral op-art patterns and vibrant rainbow wave lines for mesmerizing page designs.
- Fill pages with playful Keith Haring-style doodles or whimsical cow print blobs for an energetic, fun look.
- Draw layered and overlapping floral designs using creative shading and bold outlines for depth.
- Try structural geometric art like wagon wheel circles and mountain line drawings for visually striking effects.
- Create textured pages using dripping paint effects and mixed media splatters for bold, artistic results.
Spiral Op-Art

Spirals have a way of pulling you in, don’t they? Drawing a Spiral Op-Art doodle starts with a simple dot smack in the middle of your page—it’s like setting the stage for magic.
From there, you let your pencil wander outwards, tracing wavy lines that twist and turn all the way to the edges. Each section you make with those lines gets filled with upside down “u” shapes, stacked carefully so they look like they’re tumbling towards the center.
With every “u” you add, the spiral seems deeper, almost alive, and it’s tough to stop—so keep drawing, even when your hand wants a break!
The result? A stunning, hypnotic pattern that begs anyone who sees it to keep staring.
Clover Field Patterns
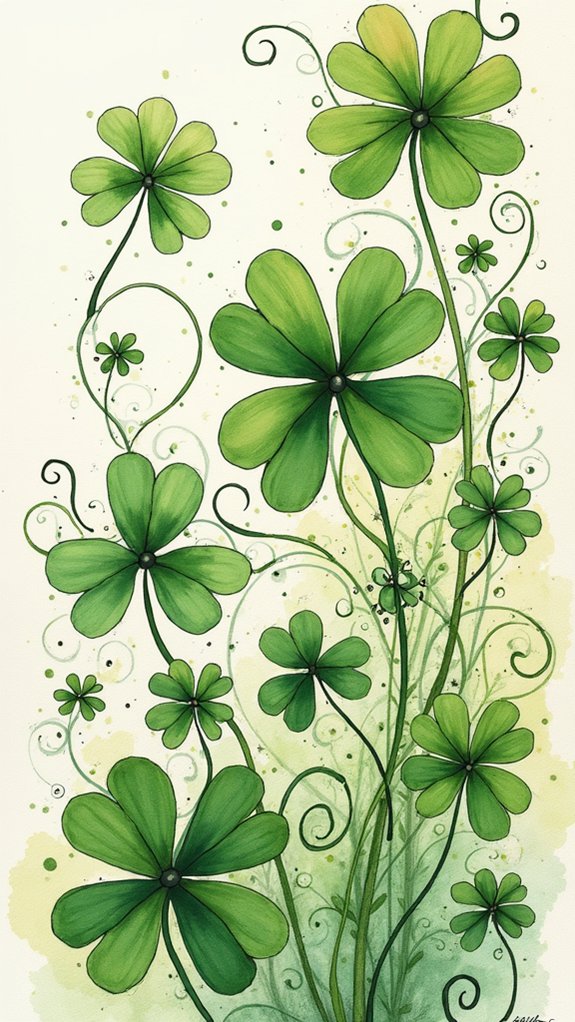
After getting lost in all that dizzy Op-Art twisting and turning, Clover Field Patterns feel like stepping into a magical meadow—except, you don’t need to worry about bees or grass stains here.
Start with three or four teardrop shapes connecting at the top to form the petals of your clover flower. Inside each petal, drop in a smaller teardrop shape for extra detail and a little pop of depth.
To keep going and make your field really bloom, stack more teardrop shapes around the outside, turning each blossom into a fluffy, leafy spectacle. Fill up the page with even more clover shapes, and if there’s any white space left, sneak in some bonus teardrops.
The result? A hypnotic field that keeps eyes wandering—minus the pollen.
Abstract Keith Haring Style Doodles

Boldness practically jumps off the page with Abstract Keith Haring style doodles, bringing a burst of cartoon energy that feels like a party you didn’t know you were invited to.
With thick lines, eye-popping colors, and those wild, wiggly figures, these doodles practically dance on your sketchbook. The fun starts when you keep drawing random shapes—circles, triangles, and squares—scattered across your page to build a background full of chaos and excitement.
Next, a long, winding squiggly line weaves around these shapes without touching them, as if it’s playing a game of tag. The result? Doodles that feel alive!
Keith Haring’s style isn’t just fun to draw, it’s a creative way to keep your energy high and your imagination wild.
Layered Flower Designs
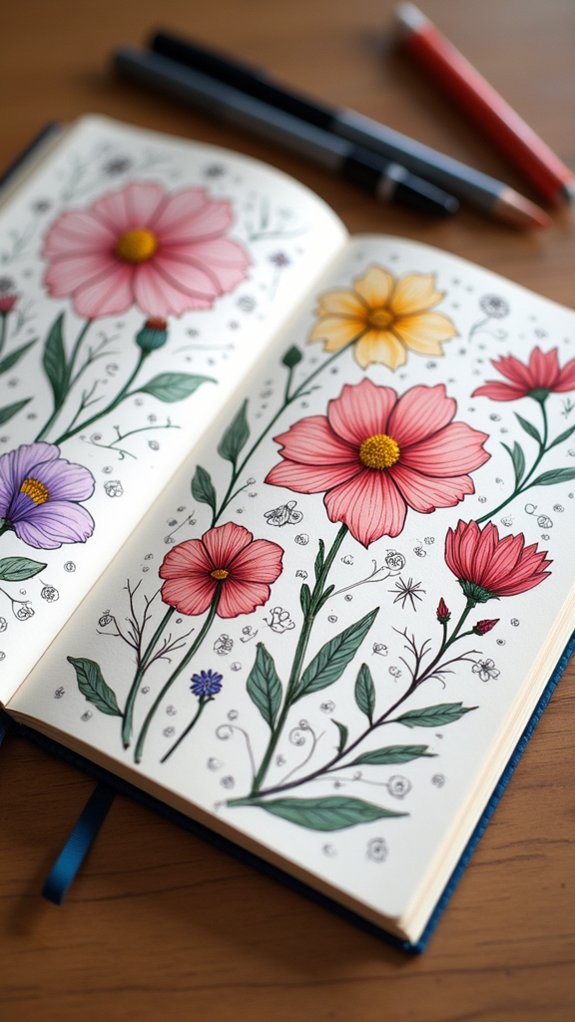
Layered flower designs are a blast because you can stack petals to make your flowers look almost 3D, and honestly, the more layers, the cooler it gets.
Playing around with color blends really makes each petal pop—imagine switching from hot pink to light purple, or mixing in bright yellow for a wow effect.
If you mess up on a petal, just call it “creative shading”—no one will know, and it keeps things interesting!
Adding Petal Dimension
There’s something seriously magical about making flowers in your sketchbook look like they could pop right off the page. To master this, many artists grab their favorite marker to draw a big circle in the middle—think of it as the flower’s heart.
Around that circle, they start adding petals, each new layer slightly bigger and carefully overlapped, making it look like the flower is blooming in real life. Differentiating each petal layer by adding shading or using multiple colors tricks the eye into seeing actual depth.
Want even more detail? Fine lines within the petals add texture, kind of like giving your flower some fancy eyelashes. Throw in petals of odd shapes or sizes for extra personality—you might just invent a wild new flower species!
Exploring Colour Blends
If you’ve ever looked at a flower and wondered how to make your doodle version feel just as alive, colour blending—especially in layered flower designs—is basically the magic trick you’ve been searching for.
First, start with a light-coloured marker for those basic outlines. Then, feel free to grab darker shades and gently layer over, letting the petals pop with extra depth.
Wiggly lines and weird, varied petal shapes? Totally welcome, because flowers in real life don’t follow the rules either. If you spot a blank space, toss in dots, tiny leaves, or bonus petals for a punch of interest!
Want to get bolder? Mix up colors and use both thin and thick markers. It’s all about feeling free and watching your flowers bloom.
Mountain Line Art
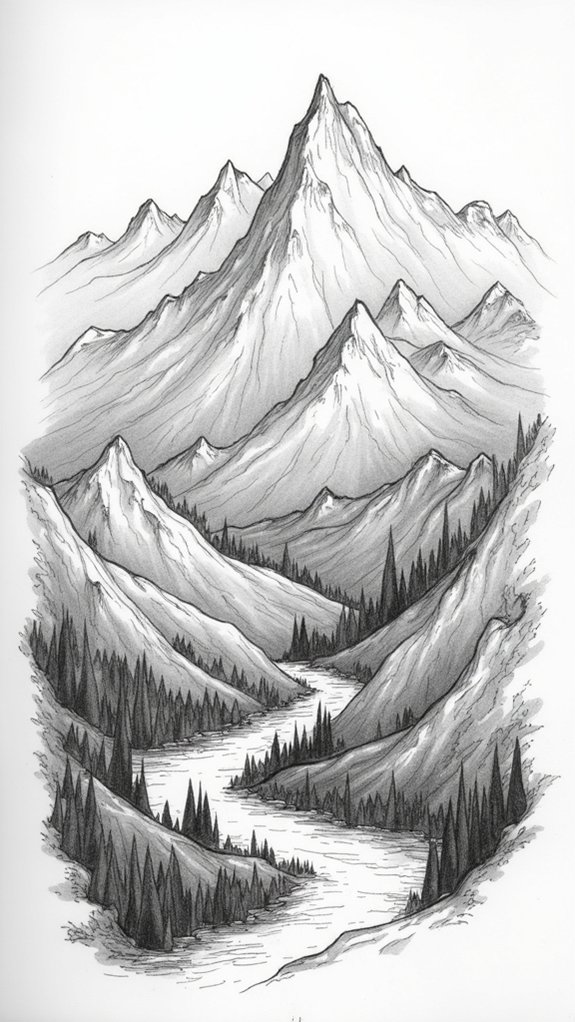
Mountains have a way of looking almost magical when turned into line art, like the secret hideouts of adventurers and dragons.
Starting a mountain line art doodle is easier than you might think—a step-by-step drawing approach helps keep things simple but stunning. With a thick marker, draw squiggly triangle shapes for the peaks, then add wavy lines inside each mountain to make the scene pop. Choose a side for darkness and fill it with tightly packed lines, using looser lines for the lighter slope.
Play around with different line thicknesses, cross-hatching, or even little dots for weathered, dramatic effects. Just imagine these scenes while doodling:
- Snowy tops sparkling in the moonlight
- Deep, shadowy valleys
- Overlapping peaks for added drama
- Misty mornings using soft, faded lines
Modern Rose Motifs
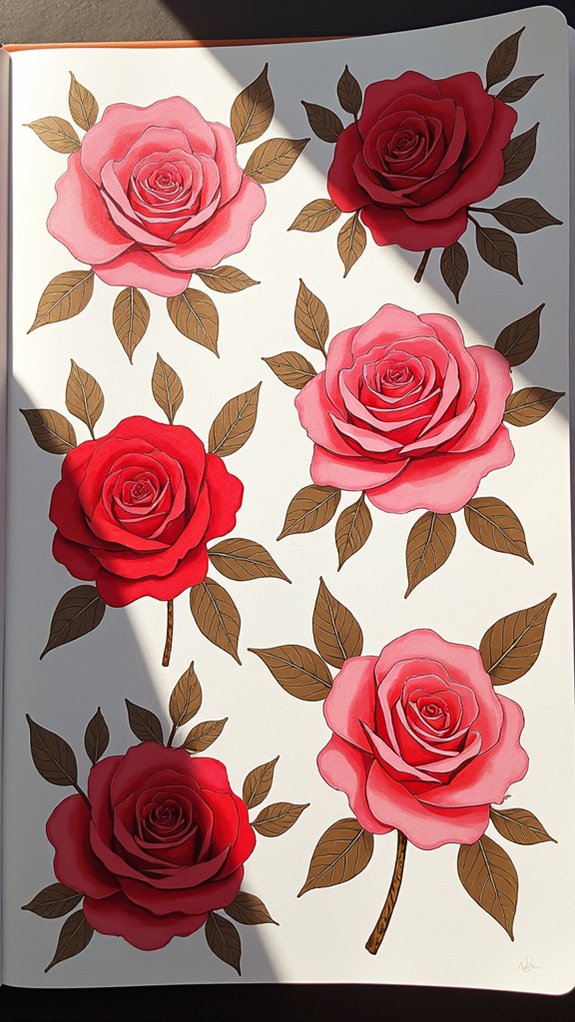
Modern rose motifs are all about keeping things simple but still looking super cool, so start by drawing easy petal shapes that overlap to make your flower pop with extra depth.
If you want your roses to stand out even more, don’t be shy—grab those bold pens and let your line work do the talking.
With just a few tweaks, like thicker outlines or some overlapping petals, your roses can go from “meh” doodle to absolute showstopper that might even impress your grandma (and she’s seen a lot of roses).
Simplifying Petal Shapes
Diving into the world of modern rose motifs can feel a bit like revealing a cool art superpower—especially when it comes to simplifying those tricky petal shapes. Instead of cramming in every wrinkle and line, envision those petals as smooth, friendly shapes curling around a tiny center.
Keeping edges rounded and soft is the trick. If you switch up the sizes and play with slightly different forms, the finished drawing pops right off the page with a fun, modern vibe! Connecting petals with light, flowing lines adds an effortless sense of movement, like the rose is dancing in a breeze.
Try tossing in some stylish extras, too! Consider this:
- Simple rounded petals circling a small center
- Varying petal sizes for visual interest
- Soft, flowing connection lines
- Abstract leaves or geometric doodles nearby
Overlapping for Depth
A clever trick for making rose doodles look super cool and realistic is to use overlapping petals to add depth. Start tiny, with a little circle at the center, then make the lines curve out and around, adding petals that layer over each other. Changing the size of these petals—some big, some small—makes it look like they’re really popping out of the page! Try mixing up your colors or using different markers to shade certain spots, creating a three-dimensional effect. For extra fanciness, make the lines inside the petals more detailed, giving them texture. Don’t forget: switching up where the petals sit keeps things lively and bold. Here’s a quick look at techniques and their effects:
| Technique | Visual Effect |
|---|---|
| Overlapping petals | Greater depth |
| Varied angles | Dynamic arrangement |
| Layered colors | 3D, realistic petals |
Bold Line Work
Even though some people think of roses as all soft and delicate, bold line work flips that idea on its head and turns the flower into an eye-catching statement.
Modern rose motifs completely rock this style by using thick, confident lines that overlap to show off every petal. Mixing up the weight of the lines adds tons of drama—picture thick outlines wrapped around petals with thinner lines inside, like the rose is almost glowing!
Want to kick things up a notch? Try adding geometric shapes around the flowers or using lots of empty space to make those bold lines really pop. This technique is more than just pretty—it makes any doodle page look powerful and unforgettable.
- Thick, smooth lines trace overlapping petals.
- Mix line weights for awesome depth.
- Leave negative spaces for cool contrast.
- Add geometric shapes for a modern twist.
Dripping Paint Effects
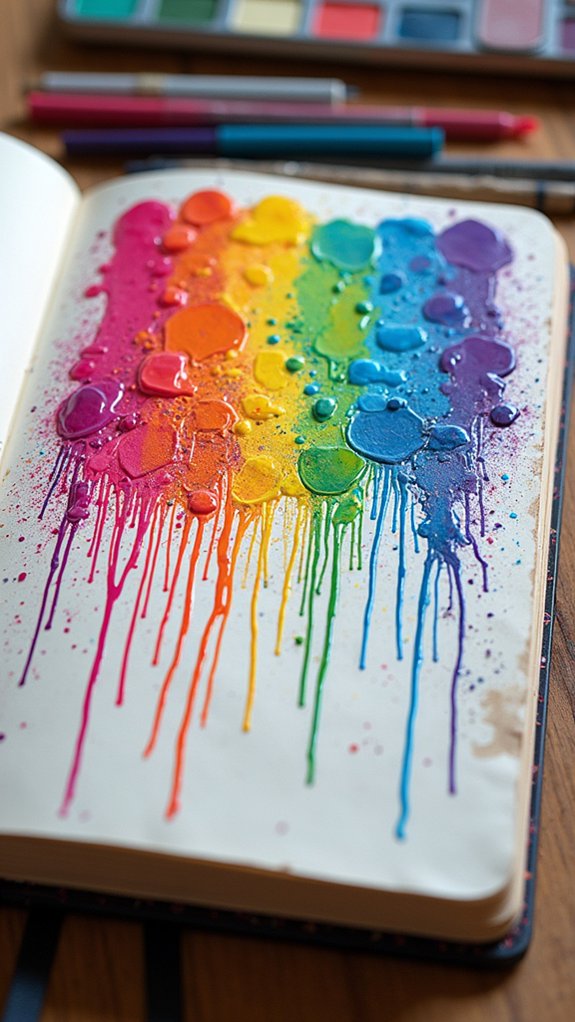
When it comes to adding drama and energy to a sketchbook page, nothing beats the excitement of dripping paint effects. This is one of those drawing ideas that can take a blank sheet and turn it into a wild, eye-catching masterpiece.
Start by grabbing a wide marker and drawing curvy, flowing lines to mimic paint slowly sliding down the paper. Next, use a thinner marker to add small, extra drips within the big ones—this adds a whole new level of depth.
Don’t forget to play with colors! Layering reds, blues, and yellows can create an explosion of vibrant puddles. For extra flair, toss in some splatters or let drips wander in surprising directions. It’s messy, bold, and seriously fun!
Rainbow Wave Lines
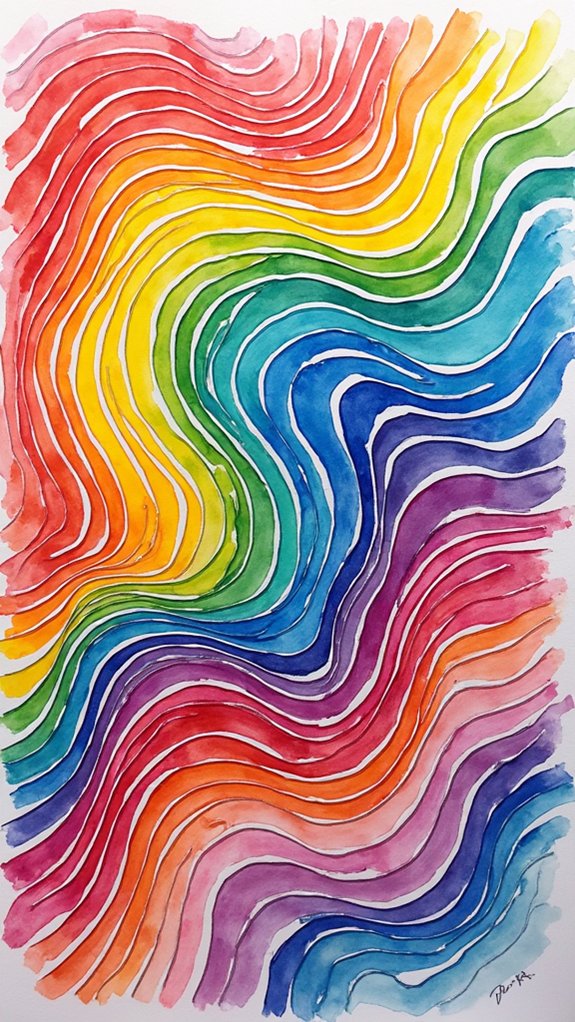
Rainbow wave lines are pure eye-candy for a sketchbook, serving up color and movement that practically dances off the page.
Anyone who loves drawing will find this doodle idea both relaxing and totally hypnotic. The creation starts with a bunch of wavy lines swooping across the paper, either neatly spaced or overlapping in dazzling patterns. Classic rainbow colors—red through violet—can fill each wave, but patterns or dots bring a sprinkle of surprise.
Alternating normal and upside-down waves adds a groovy, bouncing vibe. Don’t be afraid to mix thicker and thinner lines for punchy, cool results. When every section bursts with color, the whole page lights up, making it impossible not to smile.
- Horizontal, wavy lines glide left to right
- Bold, classic rainbow colors shimmer across sections
- Patterned fills for extra zing
- Lines vary in thickness for depth
Wagon Wheel Circles
Next up, let’s talk about wagon wheel circles—and no, you don’t need to be a pioneer or fix a broken stagecoach for this one.
This doodle starts with a simple circle and a few straight lines, but there are so many cool ways to make it unique by changing up the spokes or filling in the sections with wild patterns or bold colors.
Ready to see how a basic step-by-step turns into something way more exciting with just a few creative twists?
Step-by-Step Drawing Guide
There’s definitely something wildly satisfying about turning a blank page into a whole field of wagon wheels just by sketching some circles and lines.
With this step-by-step drawing guide, anyone can quickly transform a boring sketchbook page into a rolling scenery of circles and spokes—no artistic genius required!
It all starts with a big, bold circle. From there, a simple dot right in the center acts as the “hub,” like the heart of your wagon wheel. Then, straight lines stretch out from the middle, making your spokes.
Before you know it, you’re surrounded by wheels!
- Draw a large circle as your wagon wheel’s outline.
- Mark a dot in the center for the wheel’s hub.
- Add straight lines radiating out like spokes.
- Repeat with more circles for a wagon wheel party.
Variations for Added Interest
While basic wagon wheels are cool, turning them up a notch with some creative twists can make any sketchbook page feel like an epic adventure in doodling.
There are tons of variations for added interest to try! Switch up the sizes of your circles and play around with the number of spokes—suddenly, your page feels way more alive, almost like the wheels could roll right off the paper.
Mix thick and thin spokes for awesome depth. Want more? Fill in the spaces between spokes with dotted or striped patterns for eye-popping details. Go wild with contrasting colors; each segment can stand out and catch your eye.
Finally, try stacking or layering wheels, a bit off-center, for a groovy, spinning motion that makes your art feel extra dynamic.
Playful Cow Print Blobs
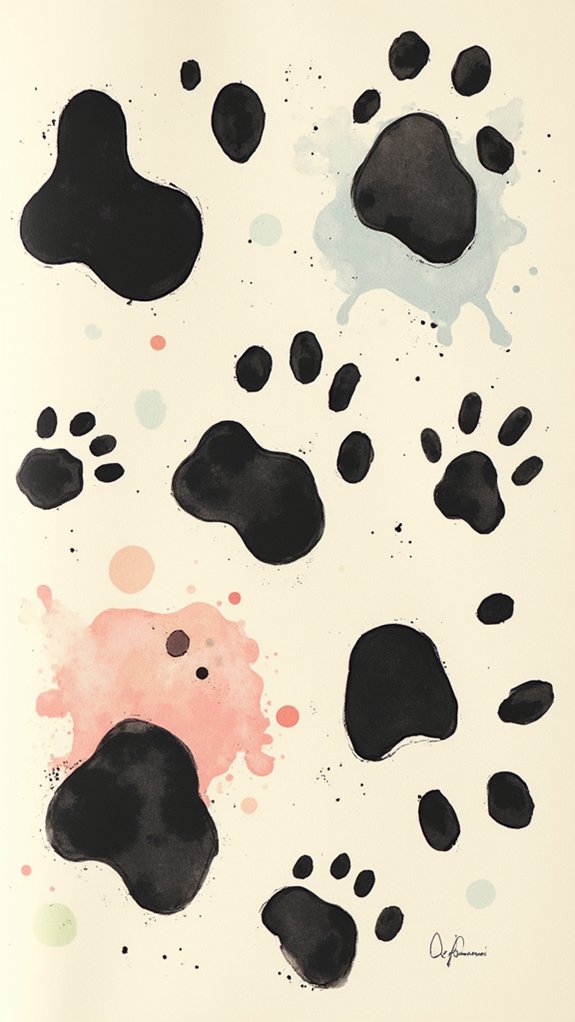
Blobs—wobbly, squishy, and full of personality—make an awesome starting point for creating playful cow print pages in any sketchbook.
Just picture it: you start by scribbling some random blob shapes all over your page, not worrying about perfection, and suddenly the whole thing looks quirky and fun. Inside each big blob, smaller, uneven shapes get added to mimic those cool, natural spots you see on a cow’s hide.
Want to give it a pop? Grab a contrasting background color to make your design stand out and make your friends drop a sweet comment or two. Go wild with textures, shading, or wild neon colors to boost the interest.
- Wavy, uneven blob outlines
- Layered mini-blobs inside the big ones
- Bright or bold page backgrounds
- Shaded, textured, or brightly colored spots
Frequently Asked Questions
What to Fill up a Sketchbook With?
When considering what to fill up a sketchbook with, one may explore Sketchbook Themes such as nature observations, abstract patterns, daily life, visual journaling, color experiments, imaginative worlds, and studies of objects, encouraging both creativity and artistic growth.
What Should a 12 Year Old Draw When Bored?
When pondering what a 12-year-old should draw when bored, creative challenges such as spiral op-art designs, vibrant floral clusters, continuous line-leaves, rainbow wave patterns, or playful abstract blobs can inspire imagination, skill-building, and artistic exploration.
How to Doodle in Sketchbook?
When considering how to doodle in a sketchbook, one might explore various doodle techniques such as spiral patterns, floral clusters, or continuous line drawings, experimenting with materials and repetitive motifs to foster creativity, skill, and confidence.
What to Draw 100 Ideas?
The Current Question seeks a diverse array of creative prompts, offering 100 ideas to inspire artists. Suggestions may include drawing natural elements, experimenting with abstract doodles, and trying repetitive patterns–each promoting creativity, skill development, and personal expression.
Conclusion
Filling up a sketchbook doesn’t have to be stressful—even if that blank page stares at you like it just ate your lunch. With these ten doodle ideas, you can turn any empty space into a party of shapes and colors. Try a wild line here, a goofy blob there, and suddenly, your page is bursting with life. Remember, there are no mistakes in doodling—only awesome discoveries. So, pick up that pen and let your imagination run wild!
Leave a Reply